> ## Documentation Index
> Fetch the complete documentation index at: https://docs.erstan.com/llms.txt
> Use this file to discover all available pages before exploring further.
# Workspaces and people
> Switch between workspaces and invite, manage, and remove the people in them.
A **workspace** is a company account in Erstan, bound to one NetSuite environment (production or sandbox). You can belong to several workspaces and switch between them, and owners and admins manage who has access to each one.
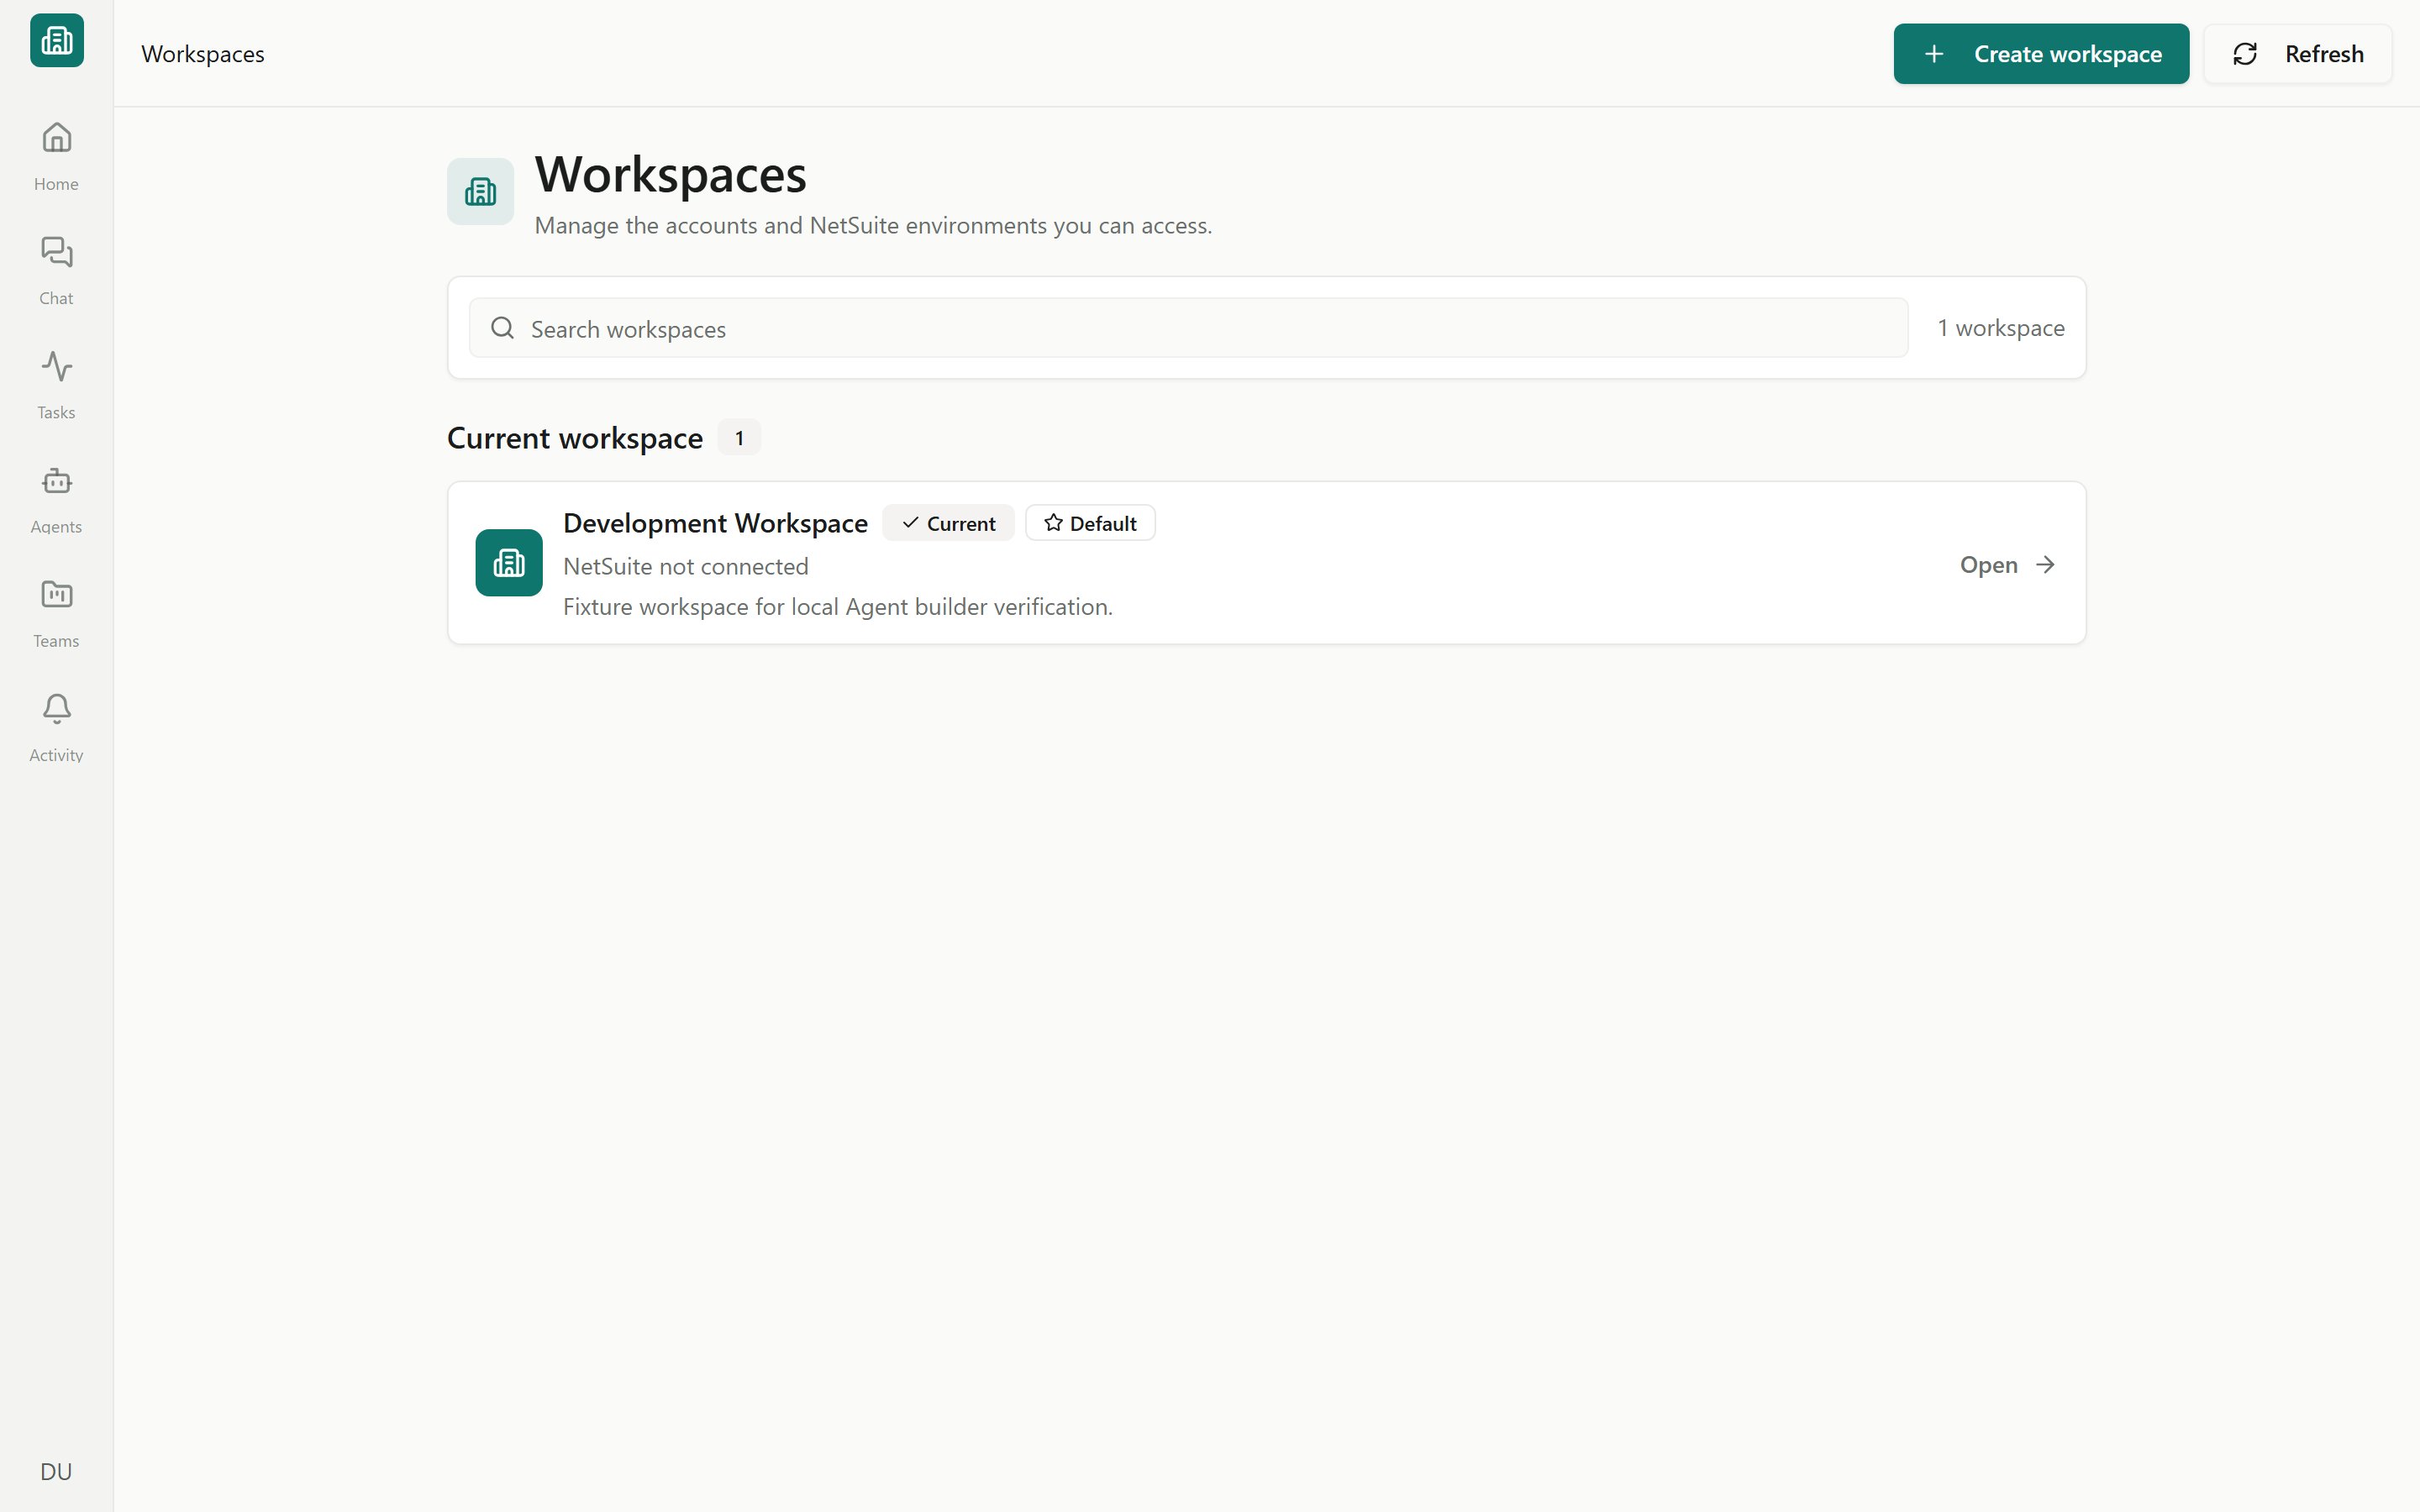 ## Workspaces
Open the **Workspaces** page to see every workspace you can access, grouped into sections so you can find the right one quickly.
| Section | What it holds |
| --------------------- | --------------------------------------------------------------------------- |
| **Current workspace** | The workspace you are in now, marked with a **Current** badge. |
| **Default workspace** | The workspace you land in by default, marked with a **Default** star badge. |
| **Other workspaces** | Every other workspace you can access. |
Each row shows the workspace name, icon, and its NetSuite account ID (or **NetSuite not connected**), plus status badges where they apply:
* **Pending setup** — onboarding is not finished; the row offers **Continue setup**.
* **Suspended** — the workspace is inactive.
* **Sub-workspace** — a workspace tied to a NetSuite sandbox, shown nested under its production workspace.
* **Has sandbox** — a production workspace that has a sandbox sub-workspace beneath it.
Each workspace maps to a single NetSuite account. A production workspace and its sandbox sub-workspace appear together so you can keep test and live work clearly separated.
### Switch workspaces
Go to the **Workspaces** page from the workspace menu.
Search by name, or browse the **Current**, **Default**, and **Other workspaces** sections.
Click **Open** on your current workspace, or **Switch** on another. A workspace that still needs onboarding shows **Continue setup** and takes you to the setup wizard.
### Create a workspace
Owners and admins can create a new workspace; regular members will not see the **Create workspace** button.
On the **Workspaces** page, click **Create workspace** to open a three-step dialog.
Set the **Workspace Name**, an optional **Description**, an optional **NetSuite Account ID**, and a workspace icon (a square image up to 256 KB).
Confirm the **Beta** plan. Other plans appear as **Coming soon** during the Beta.
Review the icon, name, description, NetSuite connector, and plan, then click **Finish setup**. The workspace is created and the onboarding wizard opens.
For the full onboarding walkthrough — naming, company details, connecting NetSuite, choosing an AI provider, and inviting teammates — see [Setting up a workspace](/admin/setup).
## People
Open the **People** page to manage the members of the current workspace. Each member has a **role** and a **status**.
The members table lists everyone in the workspace:
| Column | What it shows |
| ------------- | --------------------------------------------------------------------------------- |
| **Name** | Member name and avatar. |
| **Email** | The address they were invited with. |
| **Status** | **Active**, or **Pending** until they accept the invite and finish account setup. |
| **Last seen** | When they were last active (or **Never**). |
| **Role** | **Owner**, **Admin**, or **Member**. |
| **Actions** | Copy user ID, change role, or remove the member. |
### Roles
Full control of the workspace, including people and settings.
Manage people, create workspaces, and invite teammates.
Use the workspace to chat, run agents, and review work.
Inviting people, editing roles, and removing members are shown to owners and admins only. Regular members will not see these controls.
### Invite a member
In the **Invite by email** row on the **People** page, type the teammate's email address.
Pick **Member** or **Admin**.
Click **Add member**. The person appears in the table as **Pending** until they accept the invite and complete account setup.
Each member authorizes their own NetSuite user before agents can act on NetSuite data on their behalf. See [Authorizing your NetSuite user](/connectors/netsuite-authorize).
### Change a role
Use the role dropdown in a member's row to move them between **member**, **admin**, and **owner**.
* You can only change the role of **Active** members.
* **Pending** members cannot have their role changed until they accept the invite and finish setup.
* You cannot change your own role.
### Remove a member
Removing a member is a careful step because their assigned work, owned content, and any automations that run under their identity need to be handled first.
Some agents are configured to **run as** a specific member — they execute under that person's NetSuite identity and permissions. Removing the member can stop those automated runs from working. Review the impact and reassign before you confirm.
Click the remove (trash) action on the member's row.
The **Remove workspace member** dialog shows the member's assigned work, owned content, and automation usage.
If they have work or content to reassign, **Select a replacement member** to transfer it to.
Optionally turn on **Disable run-as workflows owned by this member** so automations no longer try to run under their identity.
Click **Remove member**, or **Remove and transfer** if you chose a replacement.
You cannot remove yourself from a workspace. Ask another owner or admin to do it.
## Frequently asked questions
Creating workspaces and managing people are limited to owners and admins. If you need access, ask an owner or admin to change your role or invite the teammate for you.
A sub-workspace is tied to a NetSuite sandbox environment and is shown nested under its production workspace. The production workspace carries a **Has sandbox** badge and the sandbox carries a **Sub-workspace** badge, so you always know which environment you are working in.
They have been invited but have not yet accepted and finished account setup. Pending members can't be assigned a different role until they complete setup.
The removal dialog summarizes their assigned work, owned content, and run-as automations. Choose a replacement member to transfer that work, and disable their run-as automations if needed, before confirming.
## Next steps
Walk through the onboarding wizard end to end.
Link the workspace to your NetSuite account.
Each member authorizes their own NetSuite access.
Organize people, agents, and work into focused teams.
## Workspaces
Open the **Workspaces** page to see every workspace you can access, grouped into sections so you can find the right one quickly.
| Section | What it holds |
| --------------------- | --------------------------------------------------------------------------- |
| **Current workspace** | The workspace you are in now, marked with a **Current** badge. |
| **Default workspace** | The workspace you land in by default, marked with a **Default** star badge. |
| **Other workspaces** | Every other workspace you can access. |
Each row shows the workspace name, icon, and its NetSuite account ID (or **NetSuite not connected**), plus status badges where they apply:
* **Pending setup** — onboarding is not finished; the row offers **Continue setup**.
* **Suspended** — the workspace is inactive.
* **Sub-workspace** — a workspace tied to a NetSuite sandbox, shown nested under its production workspace.
* **Has sandbox** — a production workspace that has a sandbox sub-workspace beneath it.
Each workspace maps to a single NetSuite account. A production workspace and its sandbox sub-workspace appear together so you can keep test and live work clearly separated.
### Switch workspaces
Go to the **Workspaces** page from the workspace menu.
Search by name, or browse the **Current**, **Default**, and **Other workspaces** sections.
Click **Open** on your current workspace, or **Switch** on another. A workspace that still needs onboarding shows **Continue setup** and takes you to the setup wizard.
### Create a workspace
Owners and admins can create a new workspace; regular members will not see the **Create workspace** button.
On the **Workspaces** page, click **Create workspace** to open a three-step dialog.
Set the **Workspace Name**, an optional **Description**, an optional **NetSuite Account ID**, and a workspace icon (a square image up to 256 KB).
Confirm the **Beta** plan. Other plans appear as **Coming soon** during the Beta.
Review the icon, name, description, NetSuite connector, and plan, then click **Finish setup**. The workspace is created and the onboarding wizard opens.
For the full onboarding walkthrough — naming, company details, connecting NetSuite, choosing an AI provider, and inviting teammates — see [Setting up a workspace](/admin/setup).
## People
Open the **People** page to manage the members of the current workspace. Each member has a **role** and a **status**.
The members table lists everyone in the workspace:
| Column | What it shows |
| ------------- | --------------------------------------------------------------------------------- |
| **Name** | Member name and avatar. |
| **Email** | The address they were invited with. |
| **Status** | **Active**, or **Pending** until they accept the invite and finish account setup. |
| **Last seen** | When they were last active (or **Never**). |
| **Role** | **Owner**, **Admin**, or **Member**. |
| **Actions** | Copy user ID, change role, or remove the member. |
### Roles
Full control of the workspace, including people and settings.
Manage people, create workspaces, and invite teammates.
Use the workspace to chat, run agents, and review work.
Inviting people, editing roles, and removing members are shown to owners and admins only. Regular members will not see these controls.
### Invite a member
In the **Invite by email** row on the **People** page, type the teammate's email address.
Pick **Member** or **Admin**.
Click **Add member**. The person appears in the table as **Pending** until they accept the invite and complete account setup.
Each member authorizes their own NetSuite user before agents can act on NetSuite data on their behalf. See [Authorizing your NetSuite user](/connectors/netsuite-authorize).
### Change a role
Use the role dropdown in a member's row to move them between **member**, **admin**, and **owner**.
* You can only change the role of **Active** members.
* **Pending** members cannot have their role changed until they accept the invite and finish setup.
* You cannot change your own role.
### Remove a member
Removing a member is a careful step because their assigned work, owned content, and any automations that run under their identity need to be handled first.
Some agents are configured to **run as** a specific member — they execute under that person's NetSuite identity and permissions. Removing the member can stop those automated runs from working. Review the impact and reassign before you confirm.
Click the remove (trash) action on the member's row.
The **Remove workspace member** dialog shows the member's assigned work, owned content, and automation usage.
If they have work or content to reassign, **Select a replacement member** to transfer it to.
Optionally turn on **Disable run-as workflows owned by this member** so automations no longer try to run under their identity.
Click **Remove member**, or **Remove and transfer** if you chose a replacement.
You cannot remove yourself from a workspace. Ask another owner or admin to do it.
## Frequently asked questions
Creating workspaces and managing people are limited to owners and admins. If you need access, ask an owner or admin to change your role or invite the teammate for you.
A sub-workspace is tied to a NetSuite sandbox environment and is shown nested under its production workspace. The production workspace carries a **Has sandbox** badge and the sandbox carries a **Sub-workspace** badge, so you always know which environment you are working in.
They have been invited but have not yet accepted and finished account setup. Pending members can't be assigned a different role until they complete setup.
The removal dialog summarizes their assigned work, owned content, and run-as automations. Choose a replacement member to transfer that work, and disable their run-as automations if needed, before confirming.
## Next steps
Walk through the onboarding wizard end to end.
Link the workspace to your NetSuite account.
Each member authorizes their own NetSuite access.
Organize people, agents, and work into focused teams.