> ## Documentation Index
> Fetch the complete documentation index at: https://docs.erstan.com/llms.txt
> Use this file to discover all available pages before exploring further.
# The visual builder
> Design an agent on the canvas — add steps, wire them together, set instructions, and publish.
The visual builder is where you shape an agent: a drag-and-drop canvas of steps, an inspector for configuring each one, and an AI assistant that can edit the agent for you. You reach it whenever you create a new agent or open an existing one to edit.
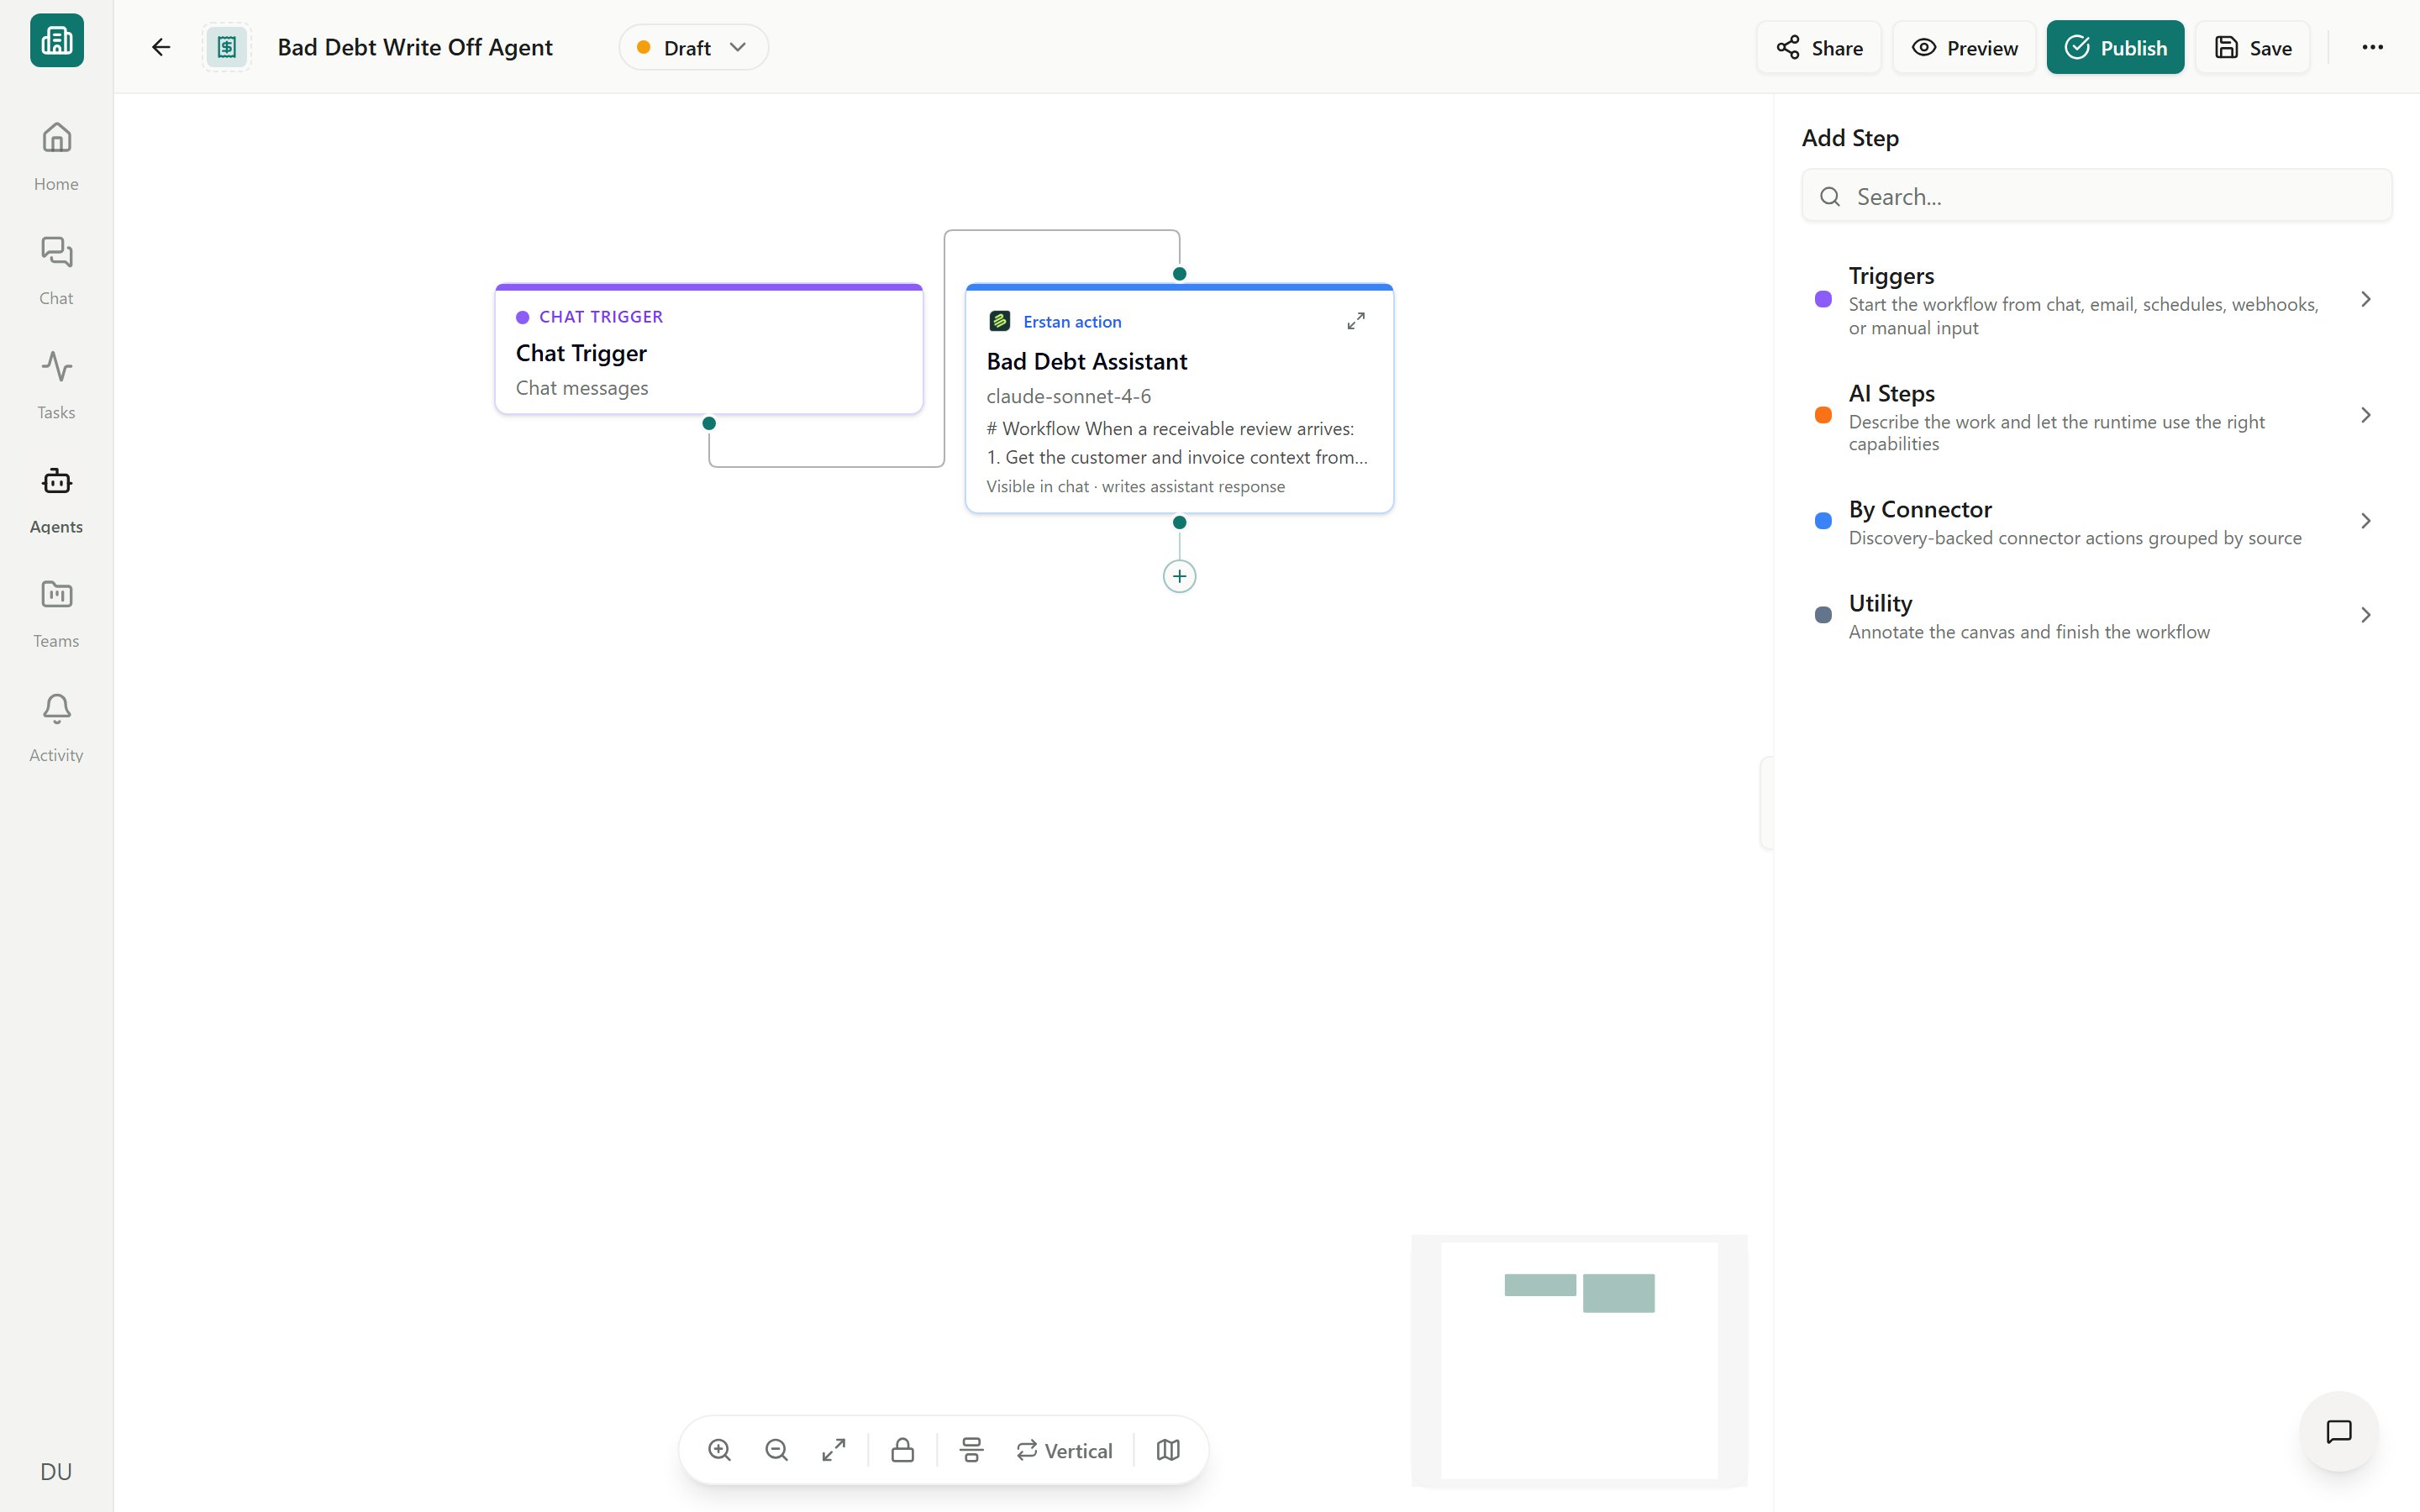 ## The canvas and node library
Every agent is a graph of **steps** (also called nodes) starting from a **trigger**. You add steps from the node library, where they are grouped into four categories:
| Category | What it holds |
| ---------------- | -------------------------------------------------------------------------------------------------------- |
| **Triggers** | How the agent starts — Chat, Form Input, Schedule, Webhook, or Email. Every agent needs one. |
| **AI Steps** | Reasoning and language steps — AI Respond, AI Think, AI Agent, AI Plan & Execute, AI Approval, and more. |
| **By Connector** | Actions that run against a connected system, such as a NetSuite read or write, or a Slack message. |
| **Utility** | Logic and helpers — Note, End, Rule-Based Decision, and similar building blocks. |
To add a step, open the **Add Step** panel, pick a step, and drop it onto the canvas. Pan and zoom to navigate; loop steps can be collapsed to keep large agents readable.
If you are deciding between **AI Think**, **AI Respond**, **AI Plan & Execute**, **AI Agent**, approvals, branches, or loops, see [Choosing AI steps](/agents/ai-steps).
Start from the default graph your agent shape provides — an Assistant opens as **Chat Trigger → AI Respond**, an Automation as **Trigger → AI Think → End** — and build out from there rather than starting empty.
For a full description of every step you can place, see the [Step reference](/agents/step-reference).
## The inspector: Steps and Properties
The right-hand inspector configures whatever you select. It has two tabs:
* **Steps** — the settings for the selected step: its instructions, the skills and tools it can use, connector choices, and step-specific options.
* **Properties** — agent-wide settings such as name, description, and avatar.
Select a step on the canvas to edit it in the **Steps** tab. This is where you write instructions, attach [skills, tools, and connections](/agents/tools-skills-connections), and tune behavior.
## Connecting steps
Steps run in the order you wire them. Drag from one step's output to another step's input to create an edge; the canvas snaps to helper lines so connections stay tidy. Branching, looping, and approval steps add their own outgoing paths that you connect to the next step in each direction.
### Canvas mode vs Agent mode
You can edit an agent two ways:
* **Canvas** — the visual graph, for arranging and wiring steps directly.
* **Agent mode** — a focused editing view of the agent's setup.
Switch between them with the mode toggle in the builder. Use whichever fits the change you are making.
### Connections and Trigger setup validation
The builder checks that your agent is runnable and flags anything missing:
* A **Connections** button appears when a step needs an external system — for example, a NetSuite action before [NetSuite is connected](/connectors/netsuite). The agent shows a **Connection required** banner until you resolve it.
* A **Trigger setup** button appears when the trigger needs configuration, such as choosing the user identity an automated run executes under (**Run As**).
Steps that write to NetSuite or other systems require approval by default. Resolve the **Connections** and **Trigger setup** warnings before you publish, and review the [write policy](/connectors/netsuite-manage) for the tools your agent uses so changes pause for [approval](/chat/approvals).
## The AI builder assistant
Rather than placing every step by hand, you can describe what you want and let the in-builder AI assistant edit the agent for you. Open the builder chat, type a request — for example, "Add a step that finds invoices over 60 days past due, then draft a follow-up email for approval" — and it applies the changes to the canvas. You can keep refining by chatting, then adjust anything by hand.
The AI assistant is a fast way to scaffold an agent or make a sweeping change. Review the resulting steps in the inspector before you publish, the same as you would for hand-built steps.
## Header actions
The builder header holds the actions for saving, testing, and shipping your agent:
Saves your changes as a **Draft**. Save often while you work; the agent is not runnable by others until you publish.
Runs the agent inside the builder so you can test it before publishing. Provide a chat message or trigger inputs, watch the run stream live, and iterate. See [Preview, publish & versions](/agents/publish-lifecycle).
Makes the agent **Live** and runnable. Publishing is gated — a triggered agent must have its trigger **Run As** configured before Publish is allowed.
Shares the agent with a team so its members can run it.
Browse saved snapshots of the agent, view a historical version, and **Restore this version** if you need to roll back.
A published agent with unsaved edits prompts you to **Save** before it runs the latest draft. Read-only agents (such as built-in ones) offer **Duplicate** so you can edit your own copy.
## Next steps
Every trigger, AI step, action, and utility you can add.
When to use AI Think, AI Respond, AI Plan & Execute, AI Agent, approvals, branches, and loops.
Attach the skills, tools, and connectors your agent needs.
Test an agent, publish it, and manage versions and Run As.
Run agents on demand or assign runs as tasks.
## The canvas and node library
Every agent is a graph of **steps** (also called nodes) starting from a **trigger**. You add steps from the node library, where they are grouped into four categories:
| Category | What it holds |
| ---------------- | -------------------------------------------------------------------------------------------------------- |
| **Triggers** | How the agent starts — Chat, Form Input, Schedule, Webhook, or Email. Every agent needs one. |
| **AI Steps** | Reasoning and language steps — AI Respond, AI Think, AI Agent, AI Plan & Execute, AI Approval, and more. |
| **By Connector** | Actions that run against a connected system, such as a NetSuite read or write, or a Slack message. |
| **Utility** | Logic and helpers — Note, End, Rule-Based Decision, and similar building blocks. |
To add a step, open the **Add Step** panel, pick a step, and drop it onto the canvas. Pan and zoom to navigate; loop steps can be collapsed to keep large agents readable.
If you are deciding between **AI Think**, **AI Respond**, **AI Plan & Execute**, **AI Agent**, approvals, branches, or loops, see [Choosing AI steps](/agents/ai-steps).
Start from the default graph your agent shape provides — an Assistant opens as **Chat Trigger → AI Respond**, an Automation as **Trigger → AI Think → End** — and build out from there rather than starting empty.
For a full description of every step you can place, see the [Step reference](/agents/step-reference).
## The inspector: Steps and Properties
The right-hand inspector configures whatever you select. It has two tabs:
* **Steps** — the settings for the selected step: its instructions, the skills and tools it can use, connector choices, and step-specific options.
* **Properties** — agent-wide settings such as name, description, and avatar.
Select a step on the canvas to edit it in the **Steps** tab. This is where you write instructions, attach [skills, tools, and connections](/agents/tools-skills-connections), and tune behavior.
## Connecting steps
Steps run in the order you wire them. Drag from one step's output to another step's input to create an edge; the canvas snaps to helper lines so connections stay tidy. Branching, looping, and approval steps add their own outgoing paths that you connect to the next step in each direction.
### Canvas mode vs Agent mode
You can edit an agent two ways:
* **Canvas** — the visual graph, for arranging and wiring steps directly.
* **Agent mode** — a focused editing view of the agent's setup.
Switch between them with the mode toggle in the builder. Use whichever fits the change you are making.
### Connections and Trigger setup validation
The builder checks that your agent is runnable and flags anything missing:
* A **Connections** button appears when a step needs an external system — for example, a NetSuite action before [NetSuite is connected](/connectors/netsuite). The agent shows a **Connection required** banner until you resolve it.
* A **Trigger setup** button appears when the trigger needs configuration, such as choosing the user identity an automated run executes under (**Run As**).
Steps that write to NetSuite or other systems require approval by default. Resolve the **Connections** and **Trigger setup** warnings before you publish, and review the [write policy](/connectors/netsuite-manage) for the tools your agent uses so changes pause for [approval](/chat/approvals).
## The AI builder assistant
Rather than placing every step by hand, you can describe what you want and let the in-builder AI assistant edit the agent for you. Open the builder chat, type a request — for example, "Add a step that finds invoices over 60 days past due, then draft a follow-up email for approval" — and it applies the changes to the canvas. You can keep refining by chatting, then adjust anything by hand.
The AI assistant is a fast way to scaffold an agent or make a sweeping change. Review the resulting steps in the inspector before you publish, the same as you would for hand-built steps.
## Header actions
The builder header holds the actions for saving, testing, and shipping your agent:
Saves your changes as a **Draft**. Save often while you work; the agent is not runnable by others until you publish.
Runs the agent inside the builder so you can test it before publishing. Provide a chat message or trigger inputs, watch the run stream live, and iterate. See [Preview, publish & versions](/agents/publish-lifecycle).
Makes the agent **Live** and runnable. Publishing is gated — a triggered agent must have its trigger **Run As** configured before Publish is allowed.
Shares the agent with a team so its members can run it.
Browse saved snapshots of the agent, view a historical version, and **Restore this version** if you need to roll back.
A published agent with unsaved edits prompts you to **Save** before it runs the latest draft. Read-only agents (such as built-in ones) offer **Duplicate** so you can edit your own copy.
## Next steps
Every trigger, AI step, action, and utility you can add.
When to use AI Think, AI Respond, AI Plan & Execute, AI Agent, approvals, branches, and loops.
Attach the skills, tools, and connectors your agent needs.
Test an agent, publish it, and manage versions and Run As.
Run agents on demand or assign runs as tasks.