> ## Documentation Index
> Fetch the complete documentation index at: https://docs.erstan.com/llms.txt
> Use this file to discover all available pages before exploring further.
# Create your first agent
> Build, preview, and publish a working agent from scratch in the visual builder.
This page walks you through building your first agent end to end — from picking a shape to publishing a Live agent your team can run. We use the simplest path, an **Assistant**, so you can get a useful agent working in minutes.
 Prefer not to build from scratch? Choose **Explore the marketplace** in the **Create a new agent** dialog to install a ready-made, NetSuite-grounded agent instead. See [Adding agents from the Marketplace](/marketplace/add-agents).
## Before you start
Agents need an AI model to think and a connector to act. Make sure your workspace has a connected [LLM provider](/connectors/llm-providers) and, for anything that touches your data, a connected [NetSuite](/connectors/netsuite) account.
## Build an Assistant step by step
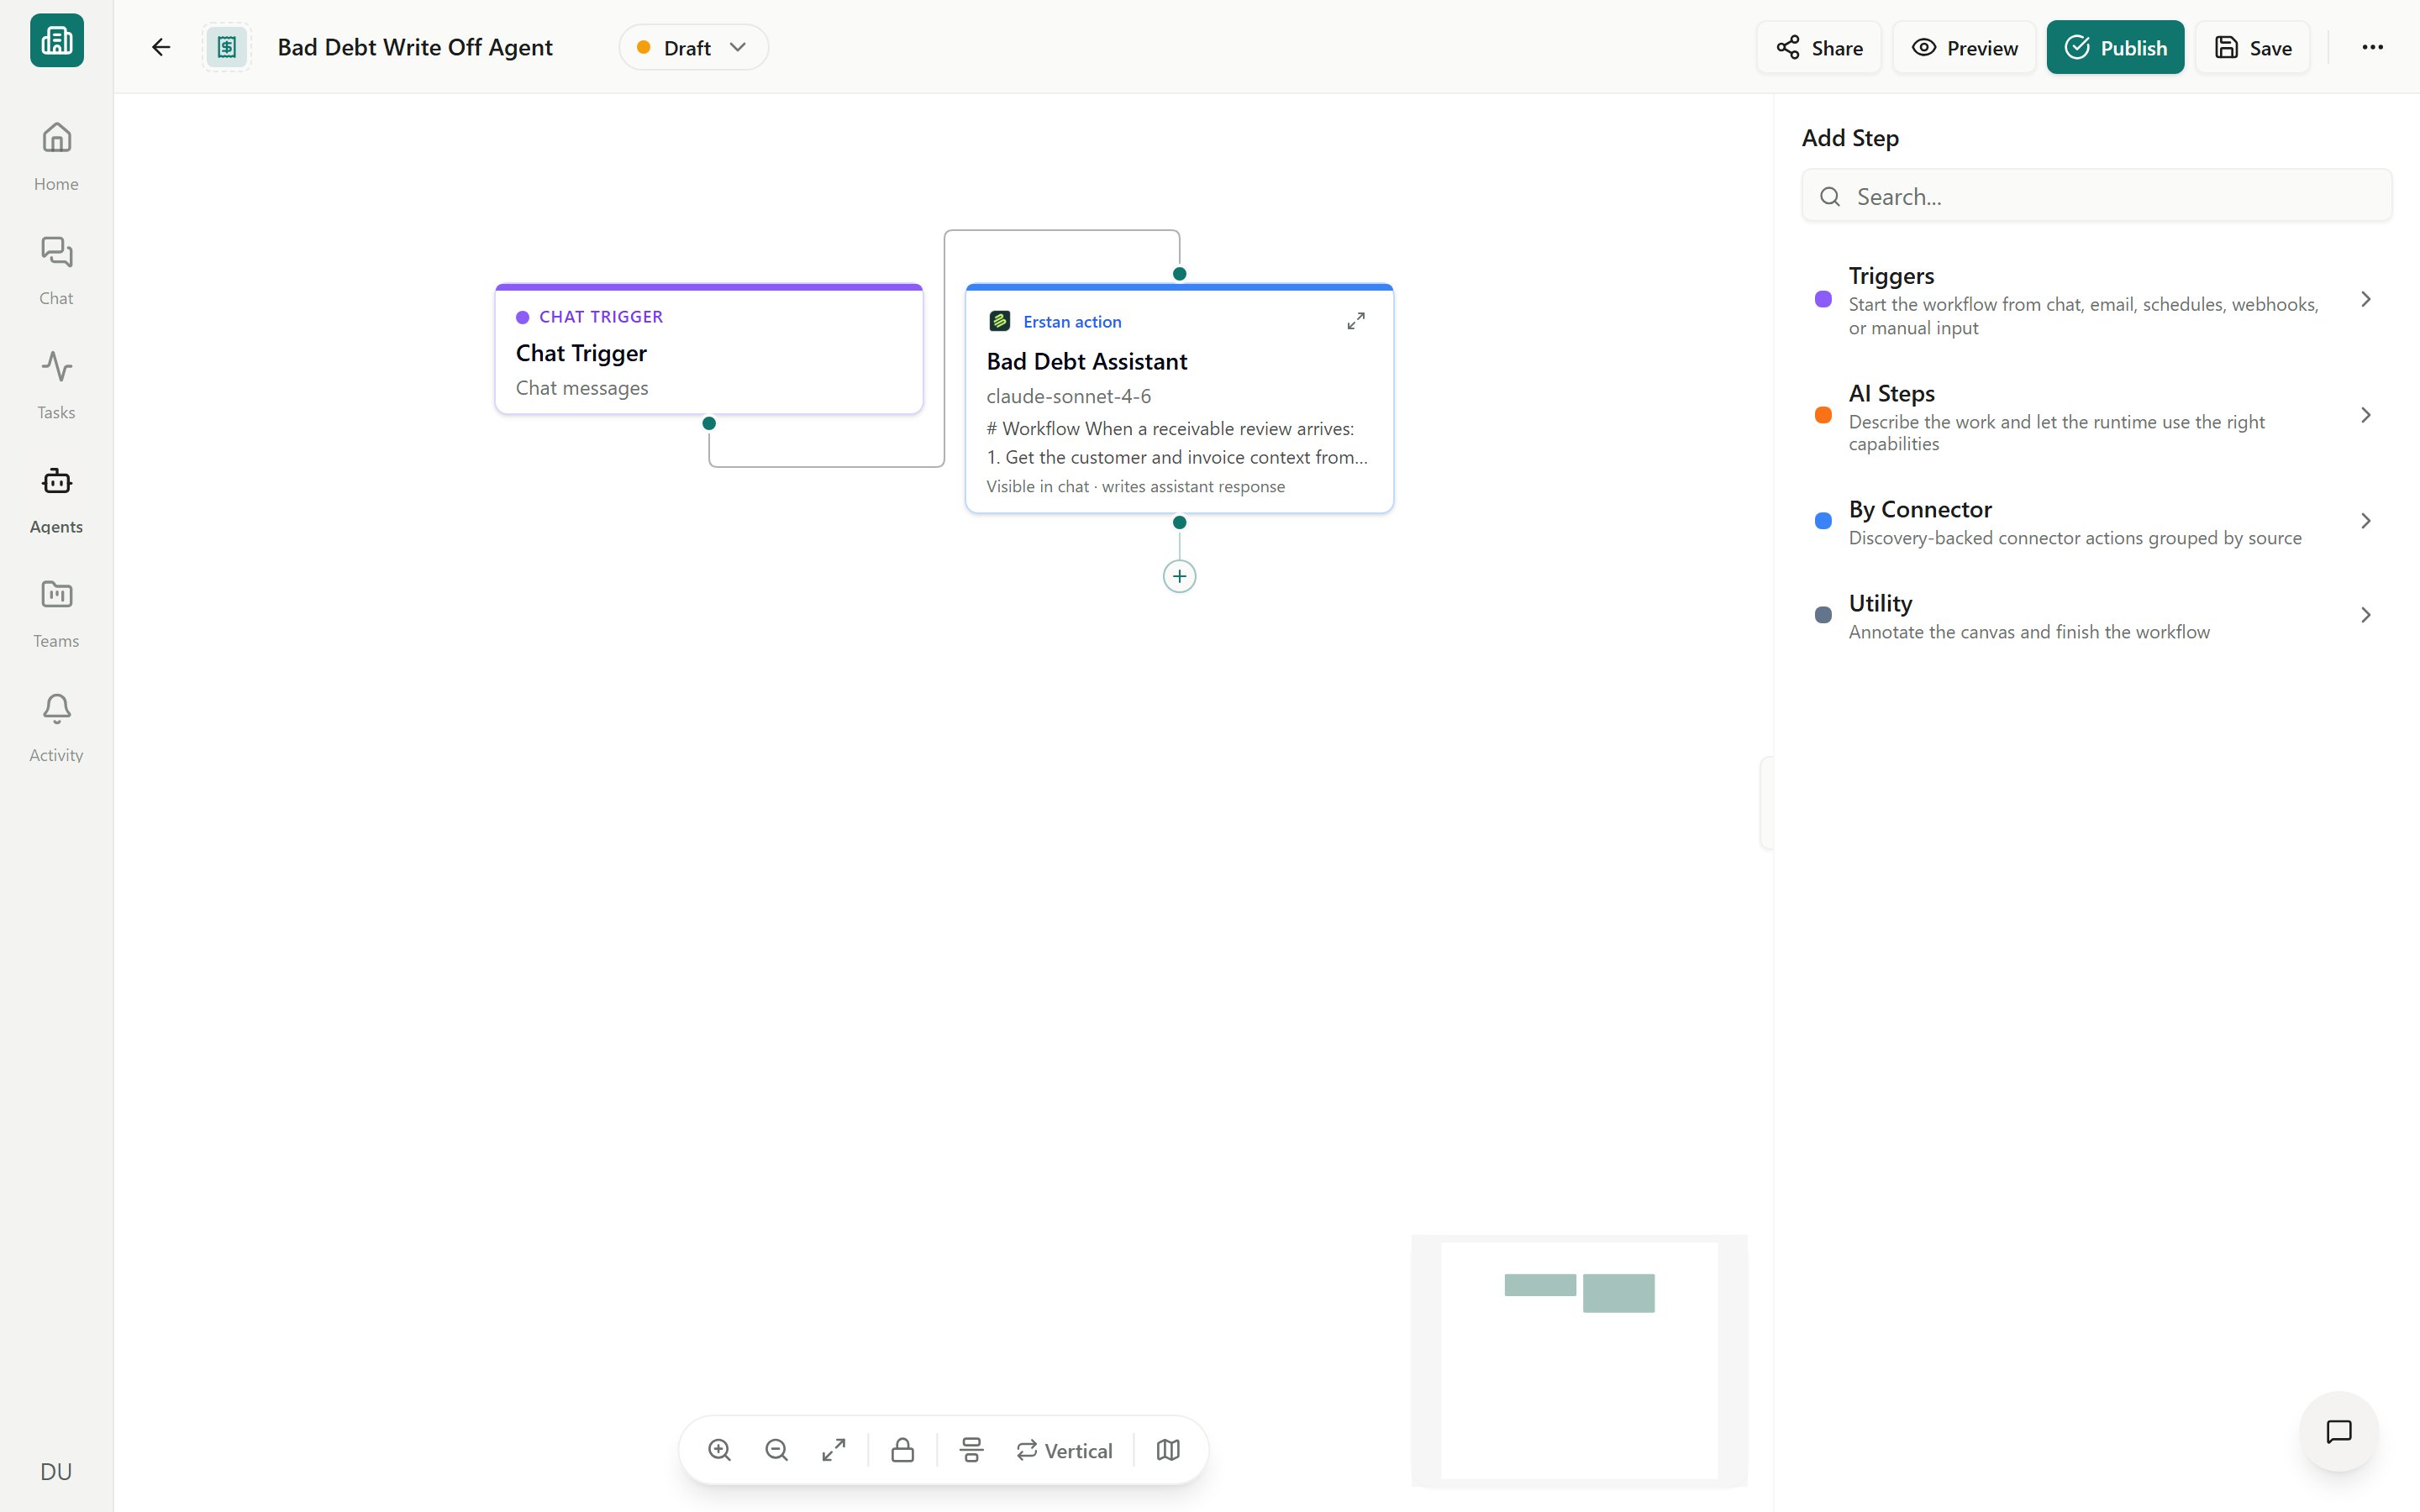
An **Assistant** is a chat-first agent — a domain expert that plans, retrieves, and acts, looping you in when it needs a decision. It is created with a **Chat Trigger** and a default graph of **Chat Trigger → AI Respond**, so you have a working agent the moment you create it.
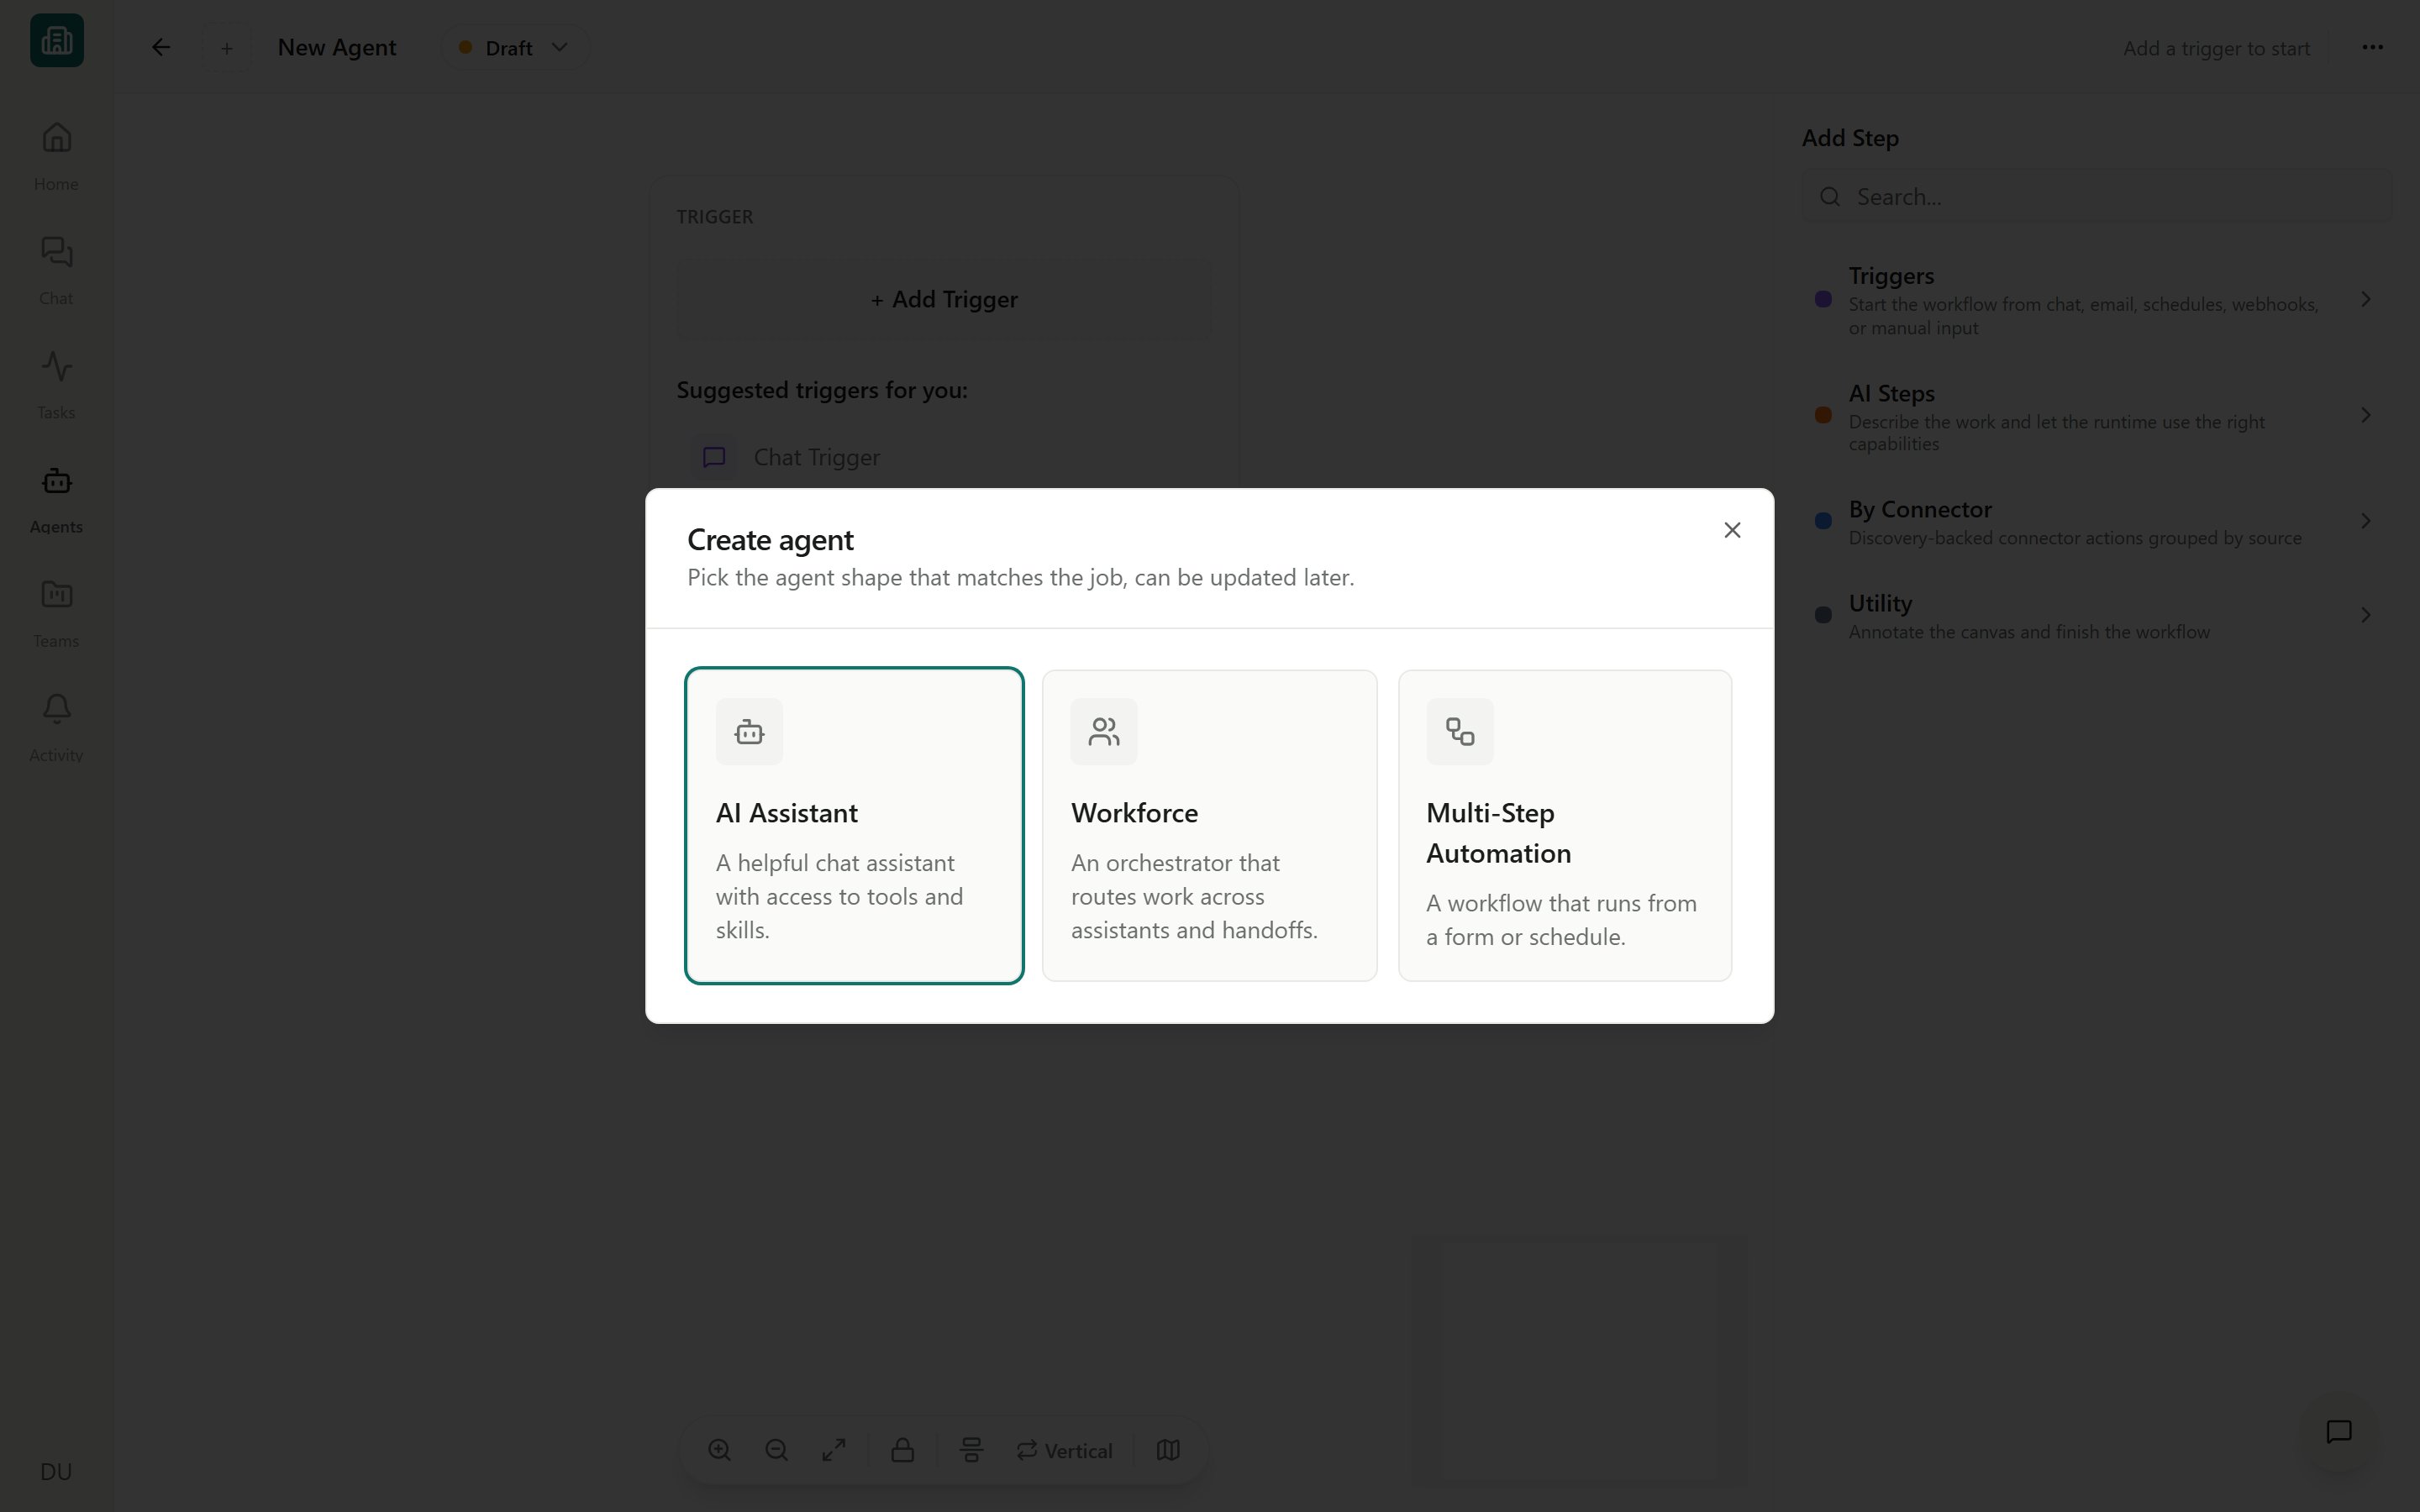
Go to **Agents** in the workspace, then click **New agent**. The **Create a new agent** dialog opens with the three shapes.
Choose **Assistant Agent** ("Domain expert"). Erstan creates it immediately with a default name (for example, *New Assistant*) and drops you into the visual builder.
**Workforce** ("Orchestrator") and **Automation** ("Set process") are the other two shapes. A Workforce routes work across other agents; an Automation runs a multi-step process from a **Form** or **Schedule**. See [Agents overview](/agents/overview) for when to use each.
In the builder, give the agent a clear name and short description (for example, *AR Aging Assistant — summarizes overdue invoices and customer balances*). This is what teammates see in the Agents library.
Your Assistant already has a **Chat Trigger**, which means people start it by chatting or `@`-mentioning it. You don't need to add another trigger for a chat-first agent.
Want it to run from a form or on a schedule instead? That's a different shape — see [Triggers](/agents/triggers).
The default **AI Respond** step is enough for a capable assistant. To add behavior, open the node library on the canvas and drag in steps from **Triggers**, **AI Steps**, **By Connector**, or **Utility**, then connect them with edges. See [The visual builder](/agents/builder) and the [Step reference](/agents/step-reference).
Use the inspector to tell the agent how to behave:
* **Instructions** — plain-language guidance ("Always show invoice number, customer, amount, and days overdue").
* **Skills** — reusable instruction packages it should load. See [Giving agents tools, skills & connections](/agents/tools-skills-connections).
* **Tools / connections** — the connector actions it may use, such as NetSuite reads. A step that needs an unconnected system shows a **Connection required** banner until you connect it.
Tools that write to NetSuite (creating or updating records) require approval by default. Keep write-capable tools set to **Require approval** unless you have a strong reason to change it. See [Approving and rejecting AI actions](/chat/approvals).
Click **Preview** in the builder header to run the agent without making it Live. Provide a chat message, watch the run stream live in the **Steps** panel, then iterate. Preview runs are tagged **Preview run** in run history.
When it works, click **Publish**. The agent's status becomes **Live** and it appears in the library for your team to run.
For triggered agents (Form, Schedule, Webhook, Email), publishing is gated until the trigger's **Run As** identity is configured and consented. A plain chat Assistant has nothing extra to configure. See [Preview, publish & versions](/agents/publish-lifecycle).
Prefer not to build from scratch? Choose **Explore the marketplace** in the **Create a new agent** dialog to install a ready-made, NetSuite-grounded agent instead. See [Adding agents from the Marketplace](/marketplace/add-agents).
## Before you start
Agents need an AI model to think and a connector to act. Make sure your workspace has a connected [LLM provider](/connectors/llm-providers) and, for anything that touches your data, a connected [NetSuite](/connectors/netsuite) account.
## Build an Assistant step by step
An **Assistant** is a chat-first agent — a domain expert that plans, retrieves, and acts, looping you in when it needs a decision. It is created with a **Chat Trigger** and a default graph of **Chat Trigger → AI Respond**, so you have a working agent the moment you create it.
Go to **Agents** in the workspace, then click **New agent**. The **Create a new agent** dialog opens with the three shapes.
Choose **Assistant Agent** ("Domain expert"). Erstan creates it immediately with a default name (for example, *New Assistant*) and drops you into the visual builder.
**Workforce** ("Orchestrator") and **Automation** ("Set process") are the other two shapes. A Workforce routes work across other agents; an Automation runs a multi-step process from a **Form** or **Schedule**. See [Agents overview](/agents/overview) for when to use each.
In the builder, give the agent a clear name and short description (for example, *AR Aging Assistant — summarizes overdue invoices and customer balances*). This is what teammates see in the Agents library.
Your Assistant already has a **Chat Trigger**, which means people start it by chatting or `@`-mentioning it. You don't need to add another trigger for a chat-first agent.
Want it to run from a form or on a schedule instead? That's a different shape — see [Triggers](/agents/triggers).
The default **AI Respond** step is enough for a capable assistant. To add behavior, open the node library on the canvas and drag in steps from **Triggers**, **AI Steps**, **By Connector**, or **Utility**, then connect them with edges. See [The visual builder](/agents/builder) and the [Step reference](/agents/step-reference).
Use the inspector to tell the agent how to behave:
* **Instructions** — plain-language guidance ("Always show invoice number, customer, amount, and days overdue").
* **Skills** — reusable instruction packages it should load. See [Giving agents tools, skills & connections](/agents/tools-skills-connections).
* **Tools / connections** — the connector actions it may use, such as NetSuite reads. A step that needs an unconnected system shows a **Connection required** banner until you connect it.
Tools that write to NetSuite (creating or updating records) require approval by default. Keep write-capable tools set to **Require approval** unless you have a strong reason to change it. See [Approving and rejecting AI actions](/chat/approvals).
Click **Preview** in the builder header to run the agent without making it Live. Provide a chat message, watch the run stream live in the **Steps** panel, then iterate. Preview runs are tagged **Preview run** in run history.
When it works, click **Publish**. The agent's status becomes **Live** and it appears in the library for your team to run.
For triggered agents (Form, Schedule, Webhook, Email), publishing is gated until the trigger's **Run As** identity is configured and consented. A plain chat Assistant has nothing extra to configure. See [Preview, publish & versions](/agents/publish-lifecycle).
 ## Let the AI builder do the work
Inside the builder you can describe what you want in plain language and have Erstan edit the agent for you — adding steps, wiring connections, and writing instructions. Use it to scaffold a first draft, then refine by hand. See [The visual builder](/agents/builder) for details.
## After you publish
A Live agent can be run on demand, assigned as a task, or started by `@`-mention in chat. Every run produces a tracked trace with live status and approvals.
You now have a Live Assistant. Run it from the library or the agent's runs page, and watch its trace in [Run history](/agents/run-history-traces).
## Next steps
Master the canvas, the node library, and the inspector.
Run on demand, assign as a task, or schedule recurring runs.
Attach the skills, tools, and connectors your agent needs.
Install a ready-made agent instead of building one.
## Let the AI builder do the work
Inside the builder you can describe what you want in plain language and have Erstan edit the agent for you — adding steps, wiring connections, and writing instructions. Use it to scaffold a first draft, then refine by hand. See [The visual builder](/agents/builder) for details.
## After you publish
A Live agent can be run on demand, assigned as a task, or started by `@`-mention in chat. Every run produces a tracked trace with live status and approvals.
You now have a Live Assistant. Run it from the library or the agent's runs page, and watch its trace in [Run history](/agents/run-history-traces).
## Next steps
Master the canvas, the node library, and the inspector.
Run on demand, assign as a task, or schedule recurring runs.
Attach the skills, tools, and connectors your agent needs.
Install a ready-made agent instead of building one.