> ## Documentation Index
> Fetch the complete documentation index at: https://docs.erstan.com/llms.txt
> Use this file to discover all available pages before exploring further.
# Connecting NetSuite
> Link your NetSuite account to Erstan using the recommended Erstan app or your own integration record.
NetSuite is Erstan's flagship connector — it gives your agents grounded access to your invoices, bills, customers, and SuiteQL data. Connecting NetSuite is a two-stage flow: an owner or admin sets up the shared workspace connection once, then each member authorizes their own NetSuite user before agents can act as them.
 ## Before you start
Setting up the workspace connection requires the **Owner** or **Admin** role (or the **canManageIntegrations** permission). Members without it authorize their own user but can't establish the shared connection — see [Authorizing your NetSuite user](/connectors/netsuite-authorize).
You'll need:
* A **NetSuite account ID** (for example `1234567` or `1234567_SB1` for a sandbox).
* A NetSuite login with permission to install a SuiteBundle (for the Erstan app method) or to create an integration record (for your own setup).
* Your browser set to **allow popups** for Erstan — the connect flow opens a NetSuite sign-in popup and polls for completion.
Erstan agents act in NetSuite using the role you sign in with. The connect dialog asks you to **choose a non-Administrator role** so agents inherit only the permissions that role allows. Avoid connecting with the Administrator role.
## Choose how to connect
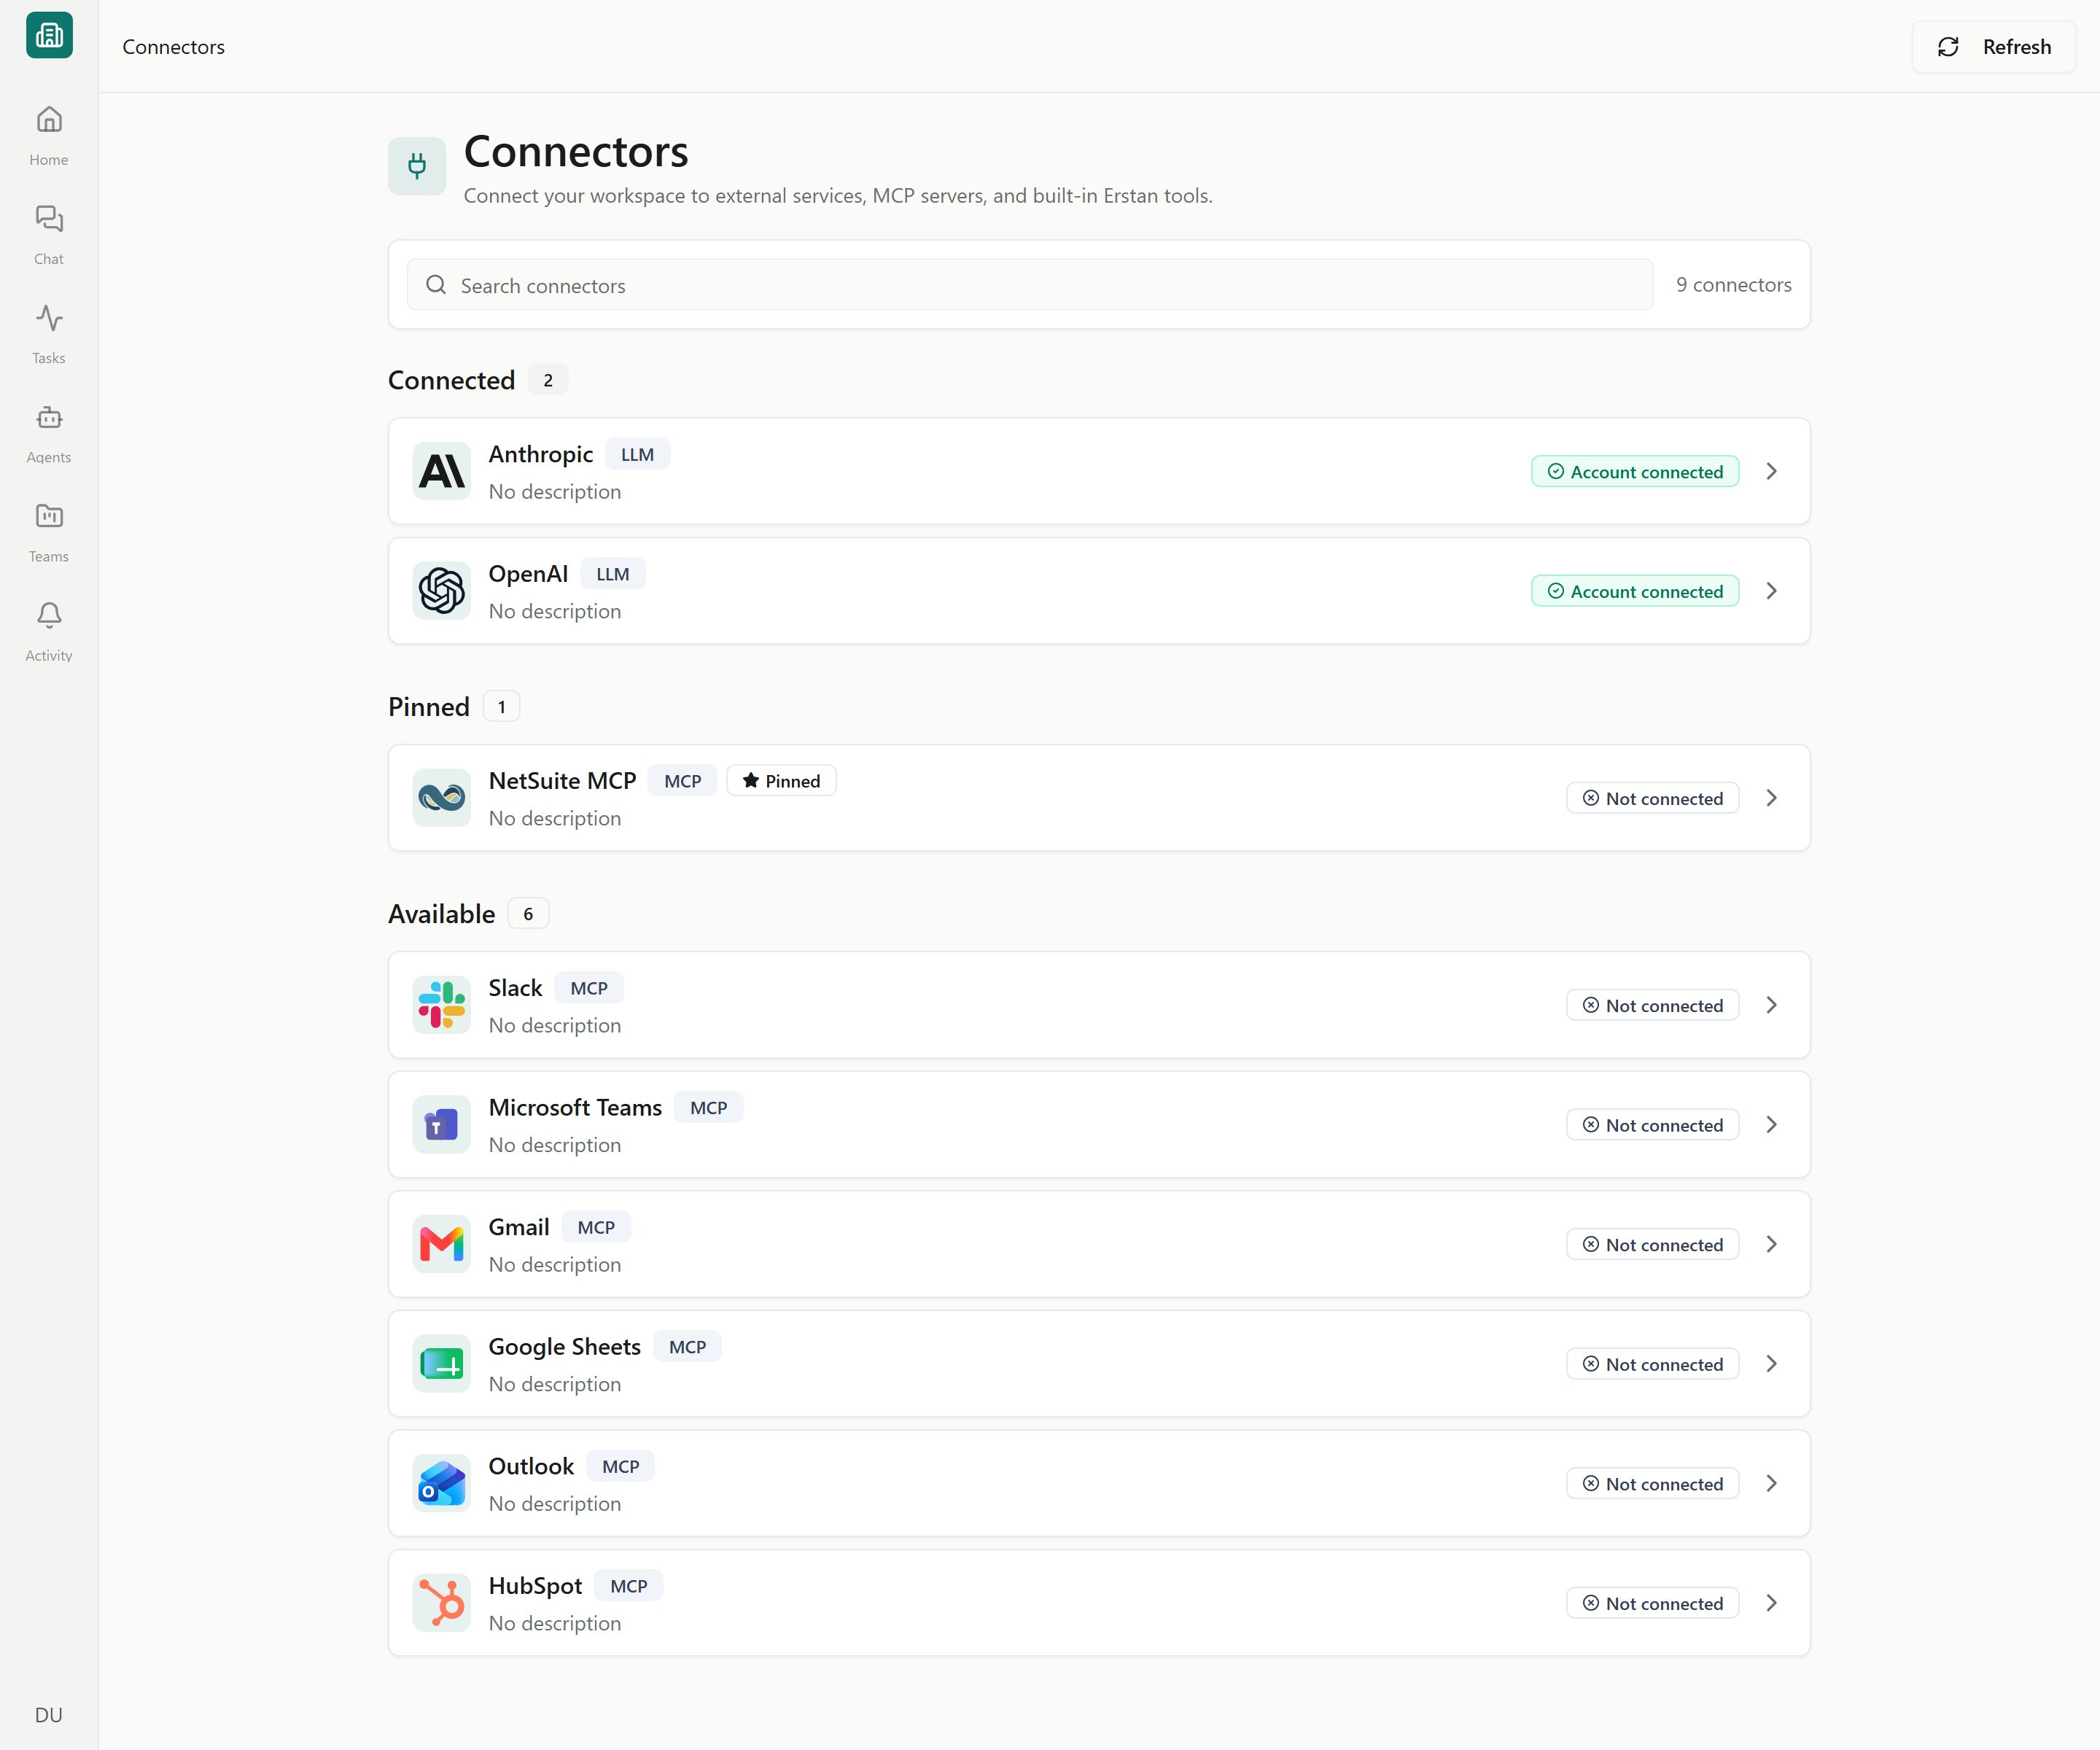
Open **Connectors** from the sidebar, click **NetSuite**, then **Connect**. In the **Connect NetSuite** dialog, under **Choose how to connect**, pick a method.
## Before you start
Setting up the workspace connection requires the **Owner** or **Admin** role (or the **canManageIntegrations** permission). Members without it authorize their own user but can't establish the shared connection — see [Authorizing your NetSuite user](/connectors/netsuite-authorize).
You'll need:
* A **NetSuite account ID** (for example `1234567` or `1234567_SB1` for a sandbox).
* A NetSuite login with permission to install a SuiteBundle (for the Erstan app method) or to create an integration record (for your own setup).
* Your browser set to **allow popups** for Erstan — the connect flow opens a NetSuite sign-in popup and polls for completion.
Erstan agents act in NetSuite using the role you sign in with. The connect dialog asks you to **choose a non-Administrator role** so agents inherit only the permissions that role allows. Avoid connecting with the Administrator role.
## Choose how to connect
Open **Connectors** from the sidebar, click **NetSuite**, then **Connect**. In the **Connect NetSuite** dialog, under **Choose how to connect**, pick a method.
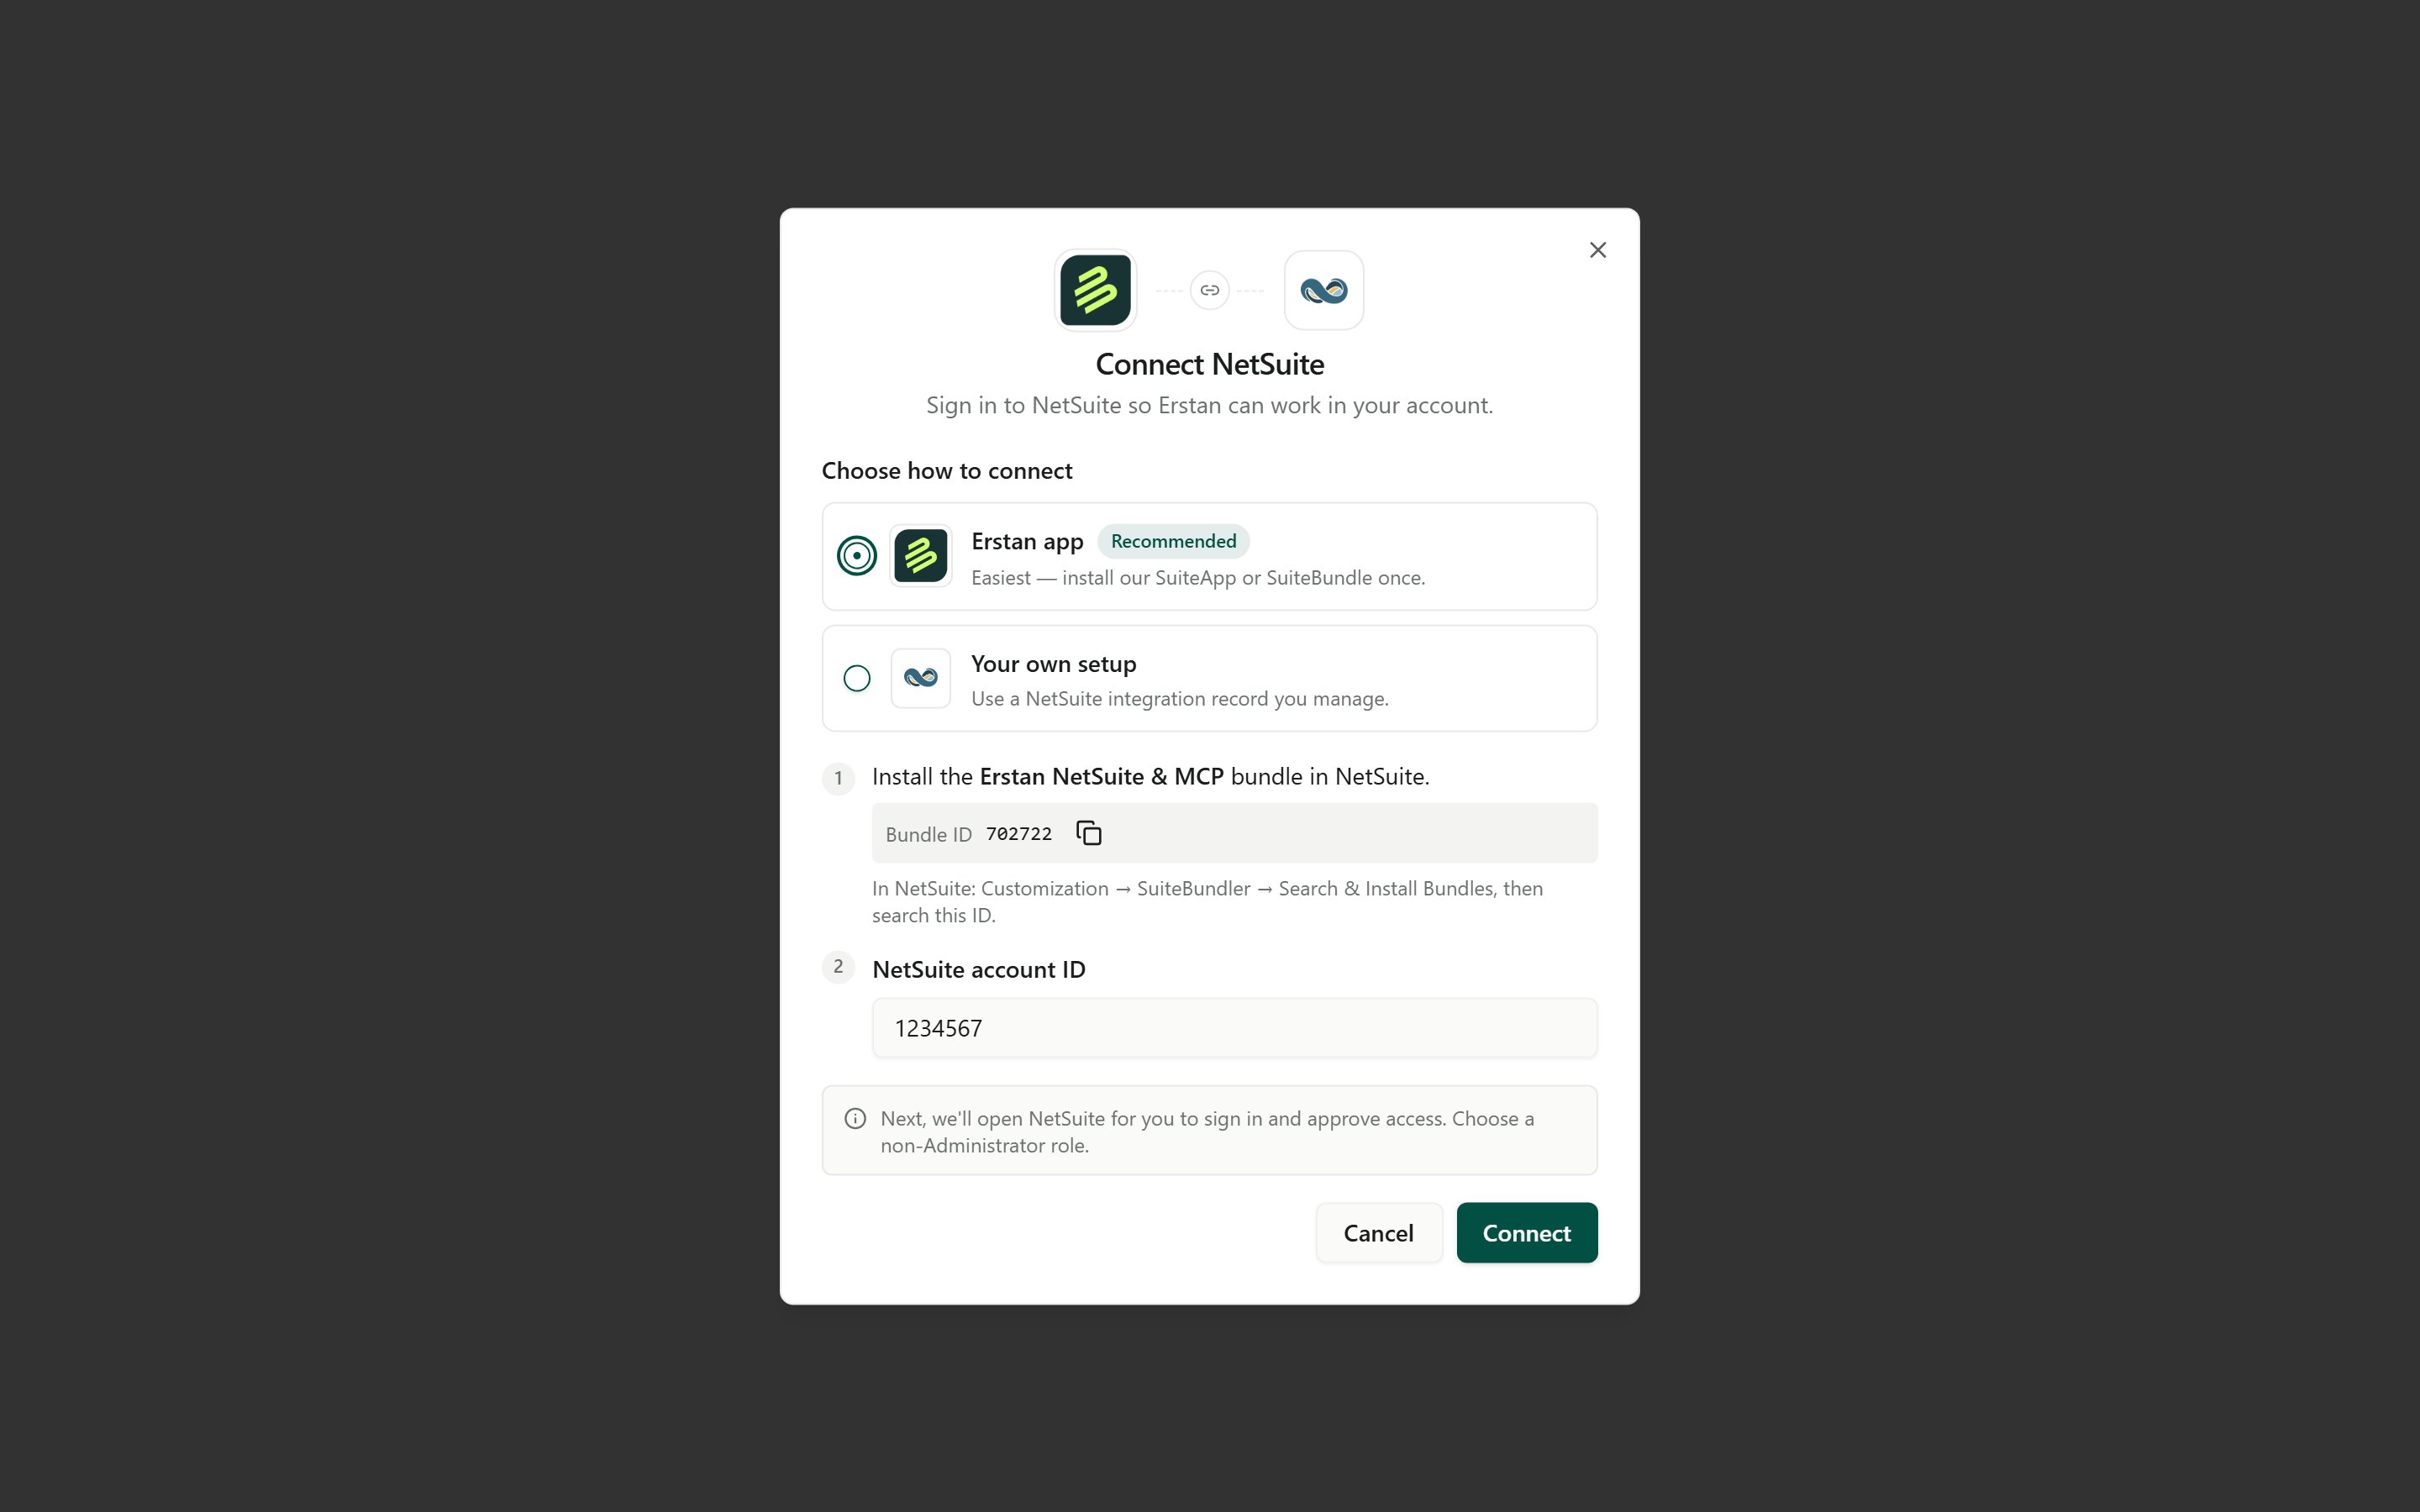 The **Erstan app** method installs a NetSuite SuiteBundle and registers the OAuth client for you automatically — you never copy a Client ID.
Copy the **Bundle ID `702722`** (Erstan NetSuite & MCP). In NetSuite, go to **Customization → SuiteBundler → Search & Install Bundles**, search for the bundle, and install it. This is a one-time step per NetSuite account.
Back in Erstan, type your **NetSuite account ID** (for example `1234567` or `1234567_SB1`).
Click **Connect**. A NetSuite popup opens — sign in and approve access, choosing a **non-Administrator role**. Erstan polls until the connection reports **Connected** and shows "NetSuite connected successfully".
This method uses Dynamic Client Registration behind the scenes, so there's nothing to paste. If nothing happens after clicking Connect, check that popups are allowed for Erstan.
The **Your own setup** method uses an OAuth integration record you create in NetSuite, and you paste its **Client ID** into Erstan.
Copy the **redirect URI** shown in the dialog and add it to your NetSuite integration record.
Type your **NetSuite account ID** (for example `1234567` or `1234567_SB1`).
Paste the **Client ID** from your integration record. Without it, Erstan returns "Enter the OAuth Client ID from your NetSuite integration record".
Click **Connect** and complete sign-in and approval in the NetSuite popup, again choosing a non-Administrator role.
Erstan also supports **Token-Based Authentication (TBA)** as a separate NetSuite connector, where you paste an Account ID, Client ID and Secret, and Token and Token Secret instead of doing OAuth. Most workspaces use the OAuth methods above.
## Two-stage authorization
Connecting NetSuite establishes the **Workspace OAuth connection** — the shared configuration that stores the OAuth client. That's the owner/admin's part. It does not yet let any individual act in NetSuite.
Each member then authorizes their own NetSuite user, so agents call NetSuite **as that person**, governed by their own NetSuite role and permissions.
Complete one of the methods above. The connector's **Setup** tab now shows a **Workspace OAuth connection** card marked Connected.
Every member opens the NetSuite connector's **Authorizations** tab (or responds to an **Authorization required** card in chat) and clicks **Authorize**. See [Authorizing your NetSuite user](/connectors/netsuite-authorize).
When both stages are done, the Setup tab shows the workspace connection as Connected and your personal status as **You authorized**. Agents can now read and act on your NetSuite data.
## After connecting
Once NetSuite is connected, the connector detail page exposes tabs for ongoing management:
* **Setup** — connection status, **Test connection**, and configuration details.
* **Authorizations** — your own authorization plus, for owners and admins, the **Workspace members** roster.
* **Knowledge** — Erstan-managed NetSuite product updates agents can retrieve for release and feature questions.
* **Tools** — the NetSuite actions agents can run, each with a write policy of **Allow**, **Require approval**, or **Deny**.
Write-capable NetSuite tools (creating or updating records) default to **Require approval**, so agents pause for you before any change. Manage these on the Tools tab — see [Managing NetSuite: tools & write policy](/connectors/netsuite-manage).
## Next steps
Each member authorizes their own NetSuite user and role.
Control which NetSuite actions agents can run and which need approval.
Fix expired auth, unhealthy connections, and re-authentication.
How per-user authorization and approvals keep you in control.
The **Erstan app** method installs a NetSuite SuiteBundle and registers the OAuth client for you automatically — you never copy a Client ID.
Copy the **Bundle ID `702722`** (Erstan NetSuite & MCP). In NetSuite, go to **Customization → SuiteBundler → Search & Install Bundles**, search for the bundle, and install it. This is a one-time step per NetSuite account.
Back in Erstan, type your **NetSuite account ID** (for example `1234567` or `1234567_SB1`).
Click **Connect**. A NetSuite popup opens — sign in and approve access, choosing a **non-Administrator role**. Erstan polls until the connection reports **Connected** and shows "NetSuite connected successfully".
This method uses Dynamic Client Registration behind the scenes, so there's nothing to paste. If nothing happens after clicking Connect, check that popups are allowed for Erstan.
The **Your own setup** method uses an OAuth integration record you create in NetSuite, and you paste its **Client ID** into Erstan.
Copy the **redirect URI** shown in the dialog and add it to your NetSuite integration record.
Type your **NetSuite account ID** (for example `1234567` or `1234567_SB1`).
Paste the **Client ID** from your integration record. Without it, Erstan returns "Enter the OAuth Client ID from your NetSuite integration record".
Click **Connect** and complete sign-in and approval in the NetSuite popup, again choosing a non-Administrator role.
Erstan also supports **Token-Based Authentication (TBA)** as a separate NetSuite connector, where you paste an Account ID, Client ID and Secret, and Token and Token Secret instead of doing OAuth. Most workspaces use the OAuth methods above.
## Two-stage authorization
Connecting NetSuite establishes the **Workspace OAuth connection** — the shared configuration that stores the OAuth client. That's the owner/admin's part. It does not yet let any individual act in NetSuite.
Each member then authorizes their own NetSuite user, so agents call NetSuite **as that person**, governed by their own NetSuite role and permissions.
Complete one of the methods above. The connector's **Setup** tab now shows a **Workspace OAuth connection** card marked Connected.
Every member opens the NetSuite connector's **Authorizations** tab (or responds to an **Authorization required** card in chat) and clicks **Authorize**. See [Authorizing your NetSuite user](/connectors/netsuite-authorize).
When both stages are done, the Setup tab shows the workspace connection as Connected and your personal status as **You authorized**. Agents can now read and act on your NetSuite data.
## After connecting
Once NetSuite is connected, the connector detail page exposes tabs for ongoing management:
* **Setup** — connection status, **Test connection**, and configuration details.
* **Authorizations** — your own authorization plus, for owners and admins, the **Workspace members** roster.
* **Knowledge** — Erstan-managed NetSuite product updates agents can retrieve for release and feature questions.
* **Tools** — the NetSuite actions agents can run, each with a write policy of **Allow**, **Require approval**, or **Deny**.
Write-capable NetSuite tools (creating or updating records) default to **Require approval**, so agents pause for you before any change. Manage these on the Tools tab — see [Managing NetSuite: tools & write policy](/connectors/netsuite-manage).
## Next steps
Each member authorizes their own NetSuite user and role.
Control which NetSuite actions agents can run and which need approval.
Fix expired auth, unhealthy connections, and re-authentication.
How per-user authorization and approvals keep you in control.