> ## Documentation Index
> Fetch the complete documentation index at: https://docs.erstan.com/llms.txt
> Use this file to discover all available pages before exploring further.
# Adding Apps
> Choose a ready-made App from the Solution Library, review its requirements, and set it up in your workspace.
Library Apps are ready-made dashboards and workspaces. A template can use live connected data, saved files, native Sheets or Databases, published Data Sources, and supporting Agents. Review the listing to see what that particular App needs.
 ## Find an App
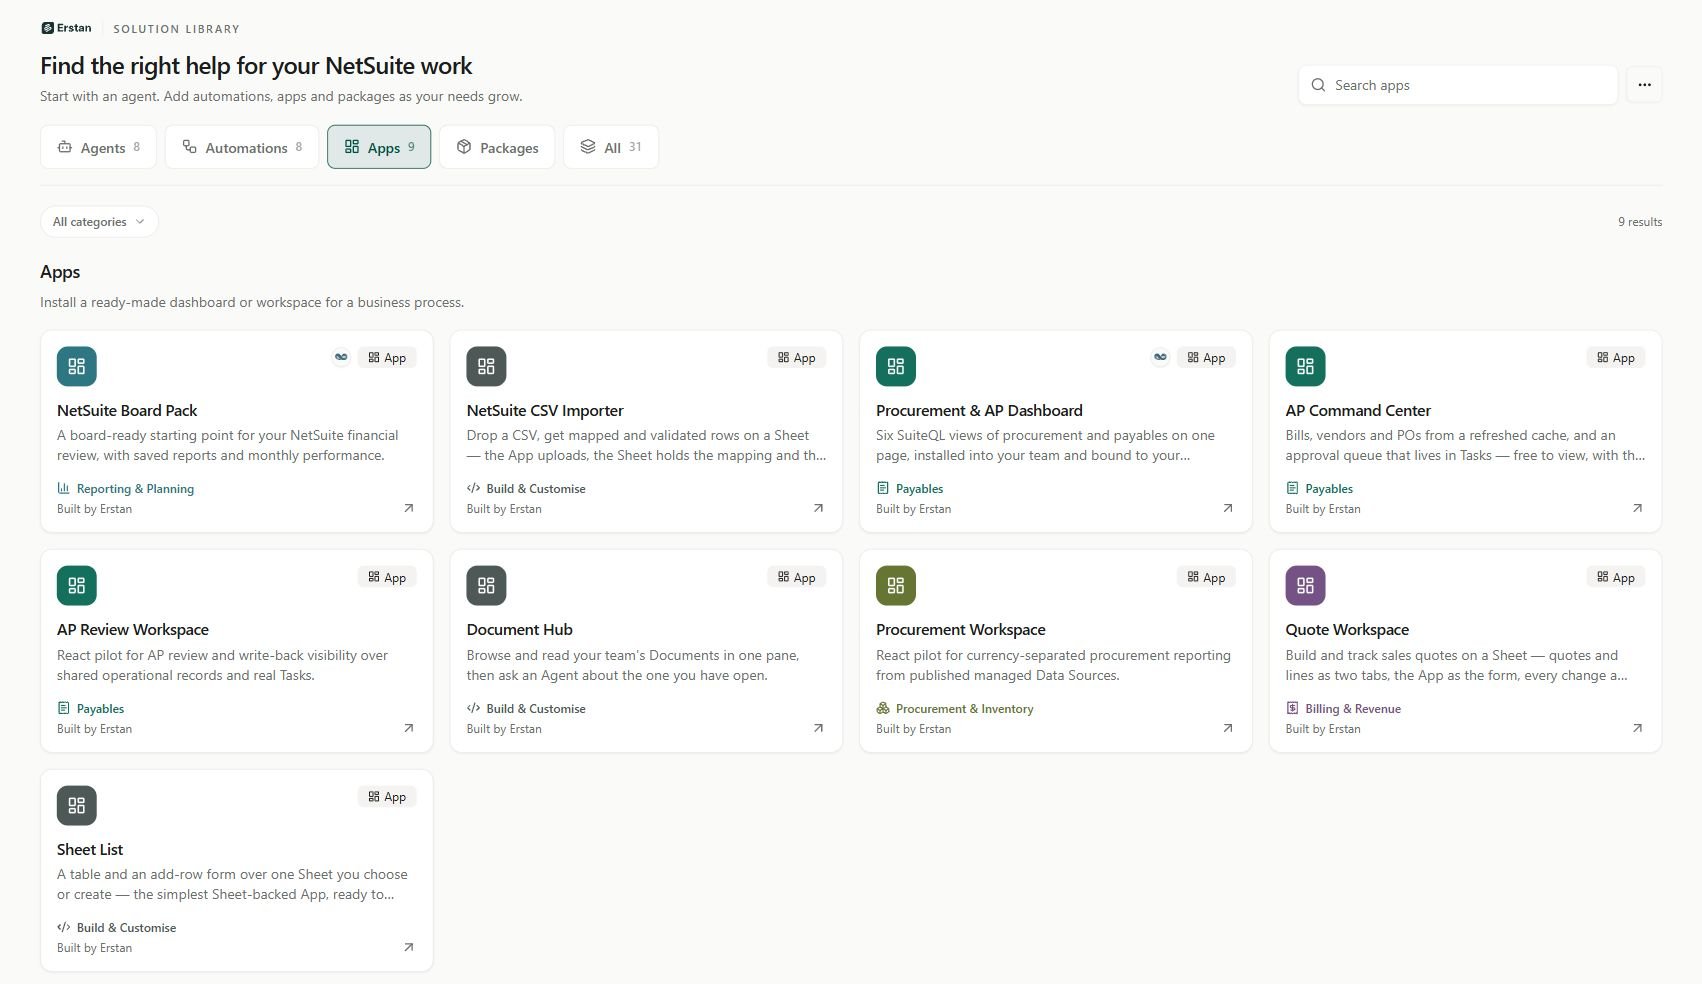
Open **Library** in the sidebar and choose **Apps**. Use **Search apps** and **Category** to narrow the list. **All** searches across the Library's types; an empty Apps result does not mean that no Agents or automations are available.
Open a card to see its purpose, version, intended users, connectors, and data requirements. The [App catalog](/library/index#apps) describes the available templates, including NetSuite Board Pack, Procurement & AP Dashboard, Document Hub, Quote Workspace, and Sheet List.
## Review and install
On the App's detail page, review **Bindings**, choose the destination under **Install into**, and check the **App name**. You need permission to create content there.
Complete the choices requested by the template. For example, select a published Data Source, choose a team for a Task queue, or select an existing Sheet or create the proposed new one. Check any required worksheet names and columns before reusing a workbook.
Review **Connectors** and **What's inside**. Connect and authorize the systems the App needs. If it includes Agents, a workspace admin must review their setup, Run As consent, and triggers.
Choose **Install**, review the destination and resources in the installation flow, and complete setup. Open the resulting App and check its data, pages, and setup status before sharing it.
Some Apps can be installed before all connections are ready. Installation alone does not prove their data will load. An included Agent may also need setup before its triggers can run.
## What the template uses
| Requirement | What to check |
| - | - |
| **Published Data Source** | Choose a compatible source you and the App's users can access. Review its inputs and returned columns. |
| **NetSuite query or tool** | Complete the required connection and your own NetSuite authorization. A connector badge does not grant a NetSuite role. |
| **Sheet or Database** | Review the original resource's permissions, structure, and the operations the App will perform. |
| **Task queue** | Check the selected team, any required project, and the fields used by the process. |
| **Cached files** | Read how the cache is populated and refreshed. A newly installed App can have empty files until its producer runs. |
| **Included Agent** | Check publication, enabled triggers, required connections, and Run As consent. |
For example, **Procurement & AP Dashboard** reads live NetSuite queries. **Procurement Workspace** uses published Data Sources. **AP Command Center** reads cached files and a Task queue. **NetSuite CSV Importer** includes a Sheet and an Agent with file and Sheet triggers. These have different setup requirements despite all appearing under Apps.
## Open and customise your App
Use **Open App** where offered on the listing, or find the installed copy in **Artifacts → Type → App**. Review whether the installation has a published version or still needs attention; do not assume every installed App is an unpublished draft.
Choose **App actions → Edit App** to customise your copy. Later edits remain a draft until published. See [Create and edit an App](/apps/create-edit) and [Publish and share](/apps/publish-share).
App access does not grant access to the underlying data or another person's credentials. Review [App data and actions](/apps/data) before sharing a working App with others.
## Find an App
Open **Library** in the sidebar and choose **Apps**. Use **Search apps** and **Category** to narrow the list. **All** searches across the Library's types; an empty Apps result does not mean that no Agents or automations are available.
Open a card to see its purpose, version, intended users, connectors, and data requirements. The [App catalog](/library/index#apps) describes the available templates, including NetSuite Board Pack, Procurement & AP Dashboard, Document Hub, Quote Workspace, and Sheet List.
## Review and install
On the App's detail page, review **Bindings**, choose the destination under **Install into**, and check the **App name**. You need permission to create content there.
Complete the choices requested by the template. For example, select a published Data Source, choose a team for a Task queue, or select an existing Sheet or create the proposed new one. Check any required worksheet names and columns before reusing a workbook.
Review **Connectors** and **What's inside**. Connect and authorize the systems the App needs. If it includes Agents, a workspace admin must review their setup, Run As consent, and triggers.
Choose **Install**, review the destination and resources in the installation flow, and complete setup. Open the resulting App and check its data, pages, and setup status before sharing it.
Some Apps can be installed before all connections are ready. Installation alone does not prove their data will load. An included Agent may also need setup before its triggers can run.
## What the template uses
| Requirement | What to check |
| - | - |
| **Published Data Source** | Choose a compatible source you and the App's users can access. Review its inputs and returned columns. |
| **NetSuite query or tool** | Complete the required connection and your own NetSuite authorization. A connector badge does not grant a NetSuite role. |
| **Sheet or Database** | Review the original resource's permissions, structure, and the operations the App will perform. |
| **Task queue** | Check the selected team, any required project, and the fields used by the process. |
| **Cached files** | Read how the cache is populated and refreshed. A newly installed App can have empty files until its producer runs. |
| **Included Agent** | Check publication, enabled triggers, required connections, and Run As consent. |
For example, **Procurement & AP Dashboard** reads live NetSuite queries. **Procurement Workspace** uses published Data Sources. **AP Command Center** reads cached files and a Task queue. **NetSuite CSV Importer** includes a Sheet and an Agent with file and Sheet triggers. These have different setup requirements despite all appearing under Apps.
## Open and customise your App
Use **Open App** where offered on the listing, or find the installed copy in **Artifacts → Type → App**. Review whether the installation has a published version or still needs attention; do not assume every installed App is an unpublished draft.
Choose **App actions → Edit App** to customise your copy. Later edits remain a draft until published. See [Create and edit an App](/apps/create-edit) and [Publish and share](/apps/publish-share).
App access does not grant access to the underlying data or another person's credentials. Review [App data and actions](/apps/data) before sharing a working App with others.